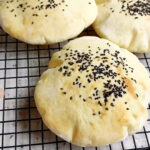
Chinese Pita Bread – Soft, Hollow & Easy at Home
Learn how to make Chinese Pita Bread at home! Soft, golden, and hollow inside—perfect for stuffing with eggs, vegetables, or meat. Easy for beginners, no complicated techniques needed.
Servings 4
Calories 413kcal
Ingredients
Pita Dough
- 400 g all-purpose flour
- 4 g high-activity yeast
- 8 g sugar
- 2 g baking powder
- 1 g salt
- 1 large egg about 50 g
- 200 g warm water 30-35°C / 85-95°F
- 10 g corn oil
- Black sesame seeds for topping (optional)
For Dusting
- Extra all-purpose flour as needed
Instructions
Mix and First Proof
- In a large bowl, combine flour, baking powder, and salt. Mix well.
- Add yeast and sugar, then crack in the egg and pour in warm water.
- Stir with chopsticks until a shaggy dough forms with no dry flour remaining.
- Add corn oil and knead into a cohesive dough. The dough may feel sticky initially—that's normal.
- Transfer to a work surface and knead using a push-and-fold motion for 3 minutes until smooth.
- Shape into a ball, place in a bowl, cover, and proof in a warm place (28–30°C) until doubled in size and airy with even bubbles.
- This typically takes about 40 minutes to 1 hour, depending on the warmth of your kitchen. The dough is ready when you gently poke it with a floured finger and the indentation slowly springs back only halfway.
Shape and Second Proof
- Once risen, turn it out onto a lightly floured surface.
- Punch and knead to remove air bubbles.
- Divide into 8 equal portions.
- Take one portion of dough, knead it a few times, then roll it into a ball and flatten it with your palm.
- Use a rolling pin to roll it into a circle about 10-12 cm (4-5 inches) in diameter and roughly 3 mm (about 1/8 inch) thick
- Lightly brush with water and sprinkle black sesame seeds if desired.
- Place on a floured surface, cover with a damp cloth, and rest for 10 minutes for the second proof.
Bake to Create Hollow Pockets
- Preheat oven to 230°C (446°F).
- Arrange dough rounds on a baking tray with space between them.
- Bake for ~6 minutes, until the breads puff and turn lightly golden with slight charring. Adjust time for thickness and oven strength.
- Remove and cool on a wire rack. The hollow pocket will naturally form as the bread cools.
Serve and Stuff
- Once slightly cooled, make a small cut on the side of each pocket (don't cut all the way through).
- Fill with your choice of eggs, luncheon meat, vegetables, salad, sauces, or cooked meats.
- Enjoy as a breakfast bread, snack, or homemade burger bun!
Nutrition
Calories: 413kcal | Carbohydrates: 79g | Protein: 12g | Fat: 5g | Saturated Fat: 1g | Polyunsaturated Fat: 1g | Monounsaturated Fat: 2g | Trans Fat: 0.01g | Cholesterol: 41mg | Sodium: 168mg | Potassium: 132mg | Fiber: 3g | Sugar: 2g | Vitamin A: 59IU | Vitamin C: 0.003mg | Calcium: 51mg | Iron: 5mg