The steamed Pumpkin Cake recipe is perfect for those who enjoy light desserts or want to try something unique and easy to prepare. Whether it’s for breakfast, a snack, or dessert, this steamed pumpkin cake is sure to impress. Follow my step-by-step guide, and you’ll have a perfect homemade treat in no time!
If you’re a regular reader of Nana with Chopsticks, you probably already know how much I love dough-based creations.
From dumplings to all kinds of buns like Milk Mantou, Red Bean Paste Buns, Fluffy Custard Buns (Nai Wong Bao), Chinese Brown Sugar Bread, and Red Bean Bread—there’s something about the process of making and enjoying these soft, pillowy treats that brings me joy.
I also love using pumpkin as a secret ingredient to elevate my dough recipes. Its natural sweetness and vibrant color make it a perfect addition to dishes like Pumpkin Mantou and Pumpkin Tang Yuan.
Another popular pumpkin treat in Chinese cuisine is the pan-fried pumpkin cake, which has a golden crust and a chewy texture.
Today’s recipe for Steamed Pumpkin Cake is completely different from the pan-fried version but just as delightful.
This cake is soft, fluffy, and naturally sweet from the pumpkin, with a texture that feels light yet satisfying.
The best part? It’s incredibly easy to make—no need to knead the dough like you would for buns or bread. All you need to do is mix, pour, and steam. It’s perfect for a quick breakfast, snack, or dessert.

Why You‘ll Love This Recipe
- Simple Ingredients: Made with pumpkin, flour, and eggs, this recipe uses pantry staples that are easy to find.
- No Mess, No Fuss: No need to get your hands sticky with dough; the batter comes together in one bowl.
- Customizable Sweetness: Thanks to the natural sweetness of pumpkin, you can use as little or as much sugar as you like.
- Nutritious and Delicious: Pumpkin is not only tasty but also packed with vitamins and fiber, making this a healthier treat.
Notes for Success
- Pumpkin Moisture Content: Different pumpkins have varying levels of moisture. If the batter feels too dry, simply add a small amount of water. If it’s too wet, sprinkle in some extra flour until it reaches the desired thick, pourable consistency.
- Adjust the Sweetness: This recipe uses only a small amount of sugar to enhance the natural flavor of the pumpkin. If you prefer a sweeter cake, feel free to adjust the sugar to your taste.
- Texture Tip: Properly steaming the pumpkin is key. Make sure it’s tender enough to mash into a smooth puree without lumps.
Ingredients
Main Ingredients
- 250g pumpkin
- 250g flour
- 3g active dry yeast
- 2 eggs
Optional Ingredients
- 30g sugar(adjust to taste)
- dried fruits (e.g., 20g raisins, 20g cranberries)
Instructions
Step 1: Prepare the Pumpkin and Batter
Steam the Pumpkin
- Wash 250g of pumpkin, peel, remove seeds, and cut into small chunks.
- Steam the pumpkin for 15–20 minutes or until tender enough to pierce easily with chopsticks.
Make Pumpkin Puree
- Mash the steamed pumpkin into a smooth puree using a spoon or fork in a large bowl.
- Allow the pumpkin puree to cool to 30–40°C. Ensure it’s warm, not hot, to avoid deactivating the yeast.

Activate the Yeast
- Add 3g active dry yeast to the warm pumpkin puree. Mix well until the yeast dissolves.
Add Eggs and Sugar
- Crack 2 eggs into the pumpkin mixture and mix thoroughly.
- Stir in 30g sugar(adjust to taste based on your preference for sweetness).
Incorporate the Flour
- Gradually sift 250g flour into the mixture while stirring.
- Mix until a thick, slow-flowing batter forms. Adjust consistency if needed:
- If the batter is too dry, add a small amount of water.
- If it’s too wet, add a bit more flour.

Step 2: First Proofing
- Cover the bowl with plastic wrap and place it in a warm environment to proof for 1–2 hours, or until the batter doubles in size.
- Tip: Use a steamer with warm water (ensuring water doesn’t touch the batter) or place the bowl in a sunny spot (avoid prolonged direct sunlight).

- Tip: Use a steamer with warm water (ensuring water doesn’t touch the batter) or place the bowl in a sunny spot (avoid prolonged direct sunlight).
Step 3: Deflate and Prepare the Mold
- Uncover the batter and stir it gently with chopsticks to release air bubbles. This ensures a finer texture in the cake.
- Line the bottom and sides of a mold with parchment paper for easy removal.
- Pour the batter into the mold and smooth the surface with a spoon or spatula.


Step 4: Second Proofing
- Allow the batter to rest in the mold for another 20 minutes in a warm environment. This step helps the cake rise further before steaming.
Step 5: Add Toppings and Steam
- Sprinkle your choice of dried fruits, such as 20g raisins or 20g cranberries, evenly on top of the batter. Adjust the quantity to your liking.
- Prepare the steamer with enough water and bring it to a boil over high heat.
- Place the mold into the steamer, cover with the lid, and steam for 20 minutes over high heat. Avoid lifting the lid during steaming to ensure the cake rises properly.

Step 6: Cool and Slice
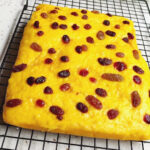
- Once steamed, carefully remove the mold from the steamer. Let the cake cool completely on a wire rack.
Remove the cake from the mold and parchment paper. Place it on a cutting board and slice it into desired portions. Serve and enjoy!
 Notes
Notes
- Pumpkin Temperature: Ensure the mashed pumpkin is warm but not too hot (30–40°C) when mixing with yeast to maintain proper fermentation.
- Flour Adjustment: Flour absorbency varies by brand. Adjust the amount based on the batter’s consistency.
- Steaming Tips: Keep the lid on during steaming to maintain the heat and ensure the cake rises properly.
- Proofing Environment: A warm, draft-free area is essential for effective proofing. Use a kitchen towel or lid to retain warmth if necessary.
Steamed Pumpkin Cake Recipe
The steamed Pumpkin Cake recipe is perfect for those who enjoy light desserts or want to try something unique and easy to prepare. Whether it's for breakfast, a snack, or dessert, this steamed pumpkin cake is sure to impress. Follow my step-by-step guide, and you'll have a perfect homemade treat in no time!Servings 4Calories 307kcalIngredients
Main Ingredients
- 250 g pumpkin
- 250 g flour
- 3 g active dry yeast
- 2 eggs
Optional Ingredients
- 30 g sugar adjust to taste
- dried fruits e.g., 20g raisins, 20g cranberries
Instructions
Step 1: Prepare the Pumpkin and Batter
- Steam the Pumpkin
- Wash 250g of pumpkin, peel, remove seeds, and cut into small chunks.
- Steam the pumpkin for 15–20 minutes or until tender enough to pierce easily with chopsticks.
- Make Pumpkin Puree
- Mash the steamed pumpkin into a smooth puree using a spoon or fork in a large bowl.
- Allow the pumpkin puree to cool to 30–40°C. Ensure it's warm, not hot, to avoid deactivating the yeast.
- Activate the Yeast
- Add 3g active dry yeast to the warm pumpkin puree. Mix well until the yeast dissolves.
- Add Eggs and Sugar
- Crack 2 eggs into the pumpkin mixture and mix thoroughly.
- Stir in 30g sugar(adjust to taste based on your preference for sweetness).
- Incorporate the Flour
- Gradually sift 250g flour into the mixture while stirring.
- Mix until a thick, slow-flowing batter forms. Adjust consistency if needed:
- If the batter is too dry, add a small amount of water.
- If it's too wet, add a bit more flour.
Step 2: First Proofing
- Cover the bowl with plastic wrap and place it in a warm environment to proof for 1–2 hours, or until the batter doubles in size.
- Tip: Use a steamer with warm water (ensuring water doesn't touch the batter) or place the bowl in a sunny spot (avoid prolonged direct sunlight).
Step 3: Deflate and Prepare the Mold
- Uncover the batter and stir it gently with chopsticks to release air bubbles. This ensures a finer texture in the cake.
- Line the bottom and sides of a mold with parchment paper for easy removal.
- Pour the batter into the mold and smooth the surface with a spoon or spatula.
Step 4: Second Proofing
- Allow the batter to rest in the mold for another 20 minutes in a warm environment. This step helps the cake rise further before steaming.
Step 5: Add Toppings and Steam
- Sprinkle your choice of dried fruits, such as 20g raisins or 20g cranberries, evenly on top of the batter. Adjust the quantity to your liking.
- Prepare the steamer with enough water and bring it to a boil over high heat.
- Place the mold into the steamer, cover with the lid, and steam for 20 minutes over high heat. Avoid lifting the lid during steaming to ensure the cake rises properly.
Step 6: Cool and Slice
- Once steamed, carefully remove the mold from the steamer. Let the cake cool completely on a wire rack.
- Remove the cake from the mold and parchment paper. Place it on a cutting board and slice it into desired portions. Serve and enjoy!
Nutrition
Calories: 307kcal | Carbohydrates: 60g | Protein: 10g | Fat: 3g | Saturated Fat: 1g | Polyunsaturated Fat: 1g | Monounsaturated Fat: 1g | Trans Fat: 0.01g | Cholesterol: 82mg | Sodium: 34mg | Potassium: 317mg | Fiber: 2g | Sugar: 9g | Vitamin A: 5439IU | Vitamin C: 6mg | Calcium: 35mg | Iron: 4mg


Leave a Reply