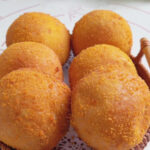
These homemade deep-fried bao buns are golden and crispy on the outside, soft and fluffy on the inside, and filled with sweet red bean paste. Made from scratch with one knead and one proof, this no-oven Chinese fried bun recipe is easier than you think and incredibly satisfying.")
My family and I are all bona fide dough lovers, especially when it comes to buns. I make all kinds of buns regularly, and steamed buns in particular are on our weekly rotation.
Today, I felt like switching things up and trying a deep-fried version instead.
I happened to have quite a bit of leftover oil from making sweet potato balls earlier, so this was the perfect way to put it to good use and avoid waste.
The process for making these fried buns is actually quite similar to classic red bean buns — it’s still all about kneading the dough, wrapping the filling, and letting it proof.
The biggest difference is that instead of steaming, I fry them.
I also simplified the workflow by using just one kneading stage and one proof, which saves a lot of time.
The result is seriously impressive. Once fried, the buns turn beautifully golden and crispy on the outside, with an audible crunch when you bite in. Inside, they stay light, fluffy, and soft, wrapping around a fragrant, sweet red bean filling that’s rich but not cloying.")
")
Why you‘ll love this recipe
- These bao buns are crispy on the outside and fluffy on the inside, with a soft, enriched bread dough.
- No oven required — everything is made entirely on the stovetop.
- The use of high-sugar-tolerant yeast ensures reliable fermentation, even with sweet fillings.
- Breadcrumbs create a golden, crunchy crust without using egg wash.
- The dough is easy to work with and forgiving, making it suitable even for beginners.
- Red bean filling adds classic sweetness, but the bun itself isn’t overly sweet.
Ingredients and substitutions
- All-purpose flour – I use all-purpose flour with moderate gluten strength to ensure the buns puff up nicely when fried without collapsing. Low-protein flour won’t give enough structure.
- High-sugar-tolerant yeast – This is important for fried and slightly sweet doughs. I recommend it because it ferments more reliably than regular yeast in higher-sugar environments.
- Granulated sugar – Just enough to lightly sweeten the dough and support yeast activity. You can adjust slightly if you prefer a sweeter bun.
- Egg – A whole egg adds richness, softness, and aroma to the dough without making it heavy.
- Cold milk – I like using cold milk straight from the fridge. It improves dough elasticity and helps create a lighter, fluffier texture after frying. Water works if milk isn’t available.
- Butter – Softened butter keeps the crumb tender and moist. If needed, corn oil works as a substitute while keeping the dough soft.
- Red bean paste – You can use homemade or store-bought red bean paste. I often use my homemade version (recipe linked here), but any smooth red bean paste with a sweetness level you enjoy will work just as well.
- Breadcrumbs – Golden breadcrumbs give the buns their signature crisp coating. I recommend fine, dry breadcrumbs for the most even crust.
- Water – Used instead of egg wash to help the breadcrumbs adhere. It keeps the coating lighter and less oily.
- Cooking oil – Use a neutral oil with a high smoke point, such as soybean or peanut oil, for stable frying.
How to make deep-fried bao buns
Make the dough
In a large bowl, crack in the egg and add the high-sugar-tolerant yeast, granulated sugar, and cold milk. Stir with chopsticks until the yeast begins to dissolve evenly.
Add the all-purpose flour and mix until a shaggy dough forms with no dry flour remaining.
 Add the softened butter and knead by hand until incorporated.
 Transfer the dough to a work surface and knead until smooth, elastic, and no longer sticky, about 10 minutes.

Shape and fill
Roll the dough into a log and divide evenly into 8 portions.
Roll each portion into a smooth ball.
Flatten each ball with a rolling pin into a round wrapper, keeping the center slightly thicker and the edges thinner.
Place about 25 g of red bean paste in the center of each wrapper.
Gather the edges toward the center, pinch tightly to seal, and gently shape into a round bun. If this is your first time, I’ve shared the folding method in a short video here.
Lightly roll each filled bun with a rolling pin to flatten slightly, about 1 cm thick. Avoid making them too thick so they fry evenly.
Coat and proof
Dip the bun into a bowl of water to lightly moisten the surface, then remove it immediately.
Roll in breadcrumbs and gently press so the crumbs adhere evenly.
Place the coated buns on a board, cover with plastic wrap, and let them proof in a warm place until they expand to about 1.5 times their original size. Proper proofing ensures a light and fluffy interior after frying.
Fry until golden
Heat cooking oil in a wok or deep pan to a depth of about 5 cm. Heat to medium-low, around 150–160°C. When chopsticks inserted into the oil produce steady bubbles, the oil is ready.
Gently add the proofed buns and fry over low heat, turning carefully with a slotted spoon so they cook evenly. 
Fry until both sides are golden brown and puffed, about 3–4 minutes.
Remove and drain on paper towels to absorb excess oil. Let rest for 2 minutes before serving.
Tips & tricks
- Use high-sugar-tolerant yeast – This prevents fermentation failure and gives a stable rise.
- Proof properly before frying – Under-proofed buns won’t be fluffy; over-proofed buns may absorb too much oil.
- Keep the oil temperature moderate – Too hot and the outside browns before the inside cooks.
- Seal the buns well – A tight seal prevents filling leakage during frying.
- Use water instead of egg wash – It keeps the coating crisp and light.
Frequently asked questions
Why did my buns deflate or not puff up in the oil?
This usually happens because 1) The oil temperature was too low, causing them to absorb oil instead of puffing, 2) They were over-proofed and collapsed when handled, or 3) The dough was not kneaded enough and lacked the strength to hold the gas bubbles created by the yeast.
My filling leaked out during frying. What went wrong?
The most common cause is an incomplete seal when shaping the buns. Make sure you pinch the dough firmly and eliminate any air pockets around the filling. Also, ensure the dough disc has a thicker center to act as a strong base under the weight of the filling.
Can I use regular active dry yeast instead of instant yeast?
Yes, but you should “bloom” it first. Warm the iced milk very slightly (to about 40°C / 105°F, just lukewarm) and mix it with the sugar and yeast in the bowl. Let it sit for 5-10 minutes until foamy, then add the egg and flour. Using cold liquid with regular yeast may not activate it properly.
No-Oven Fried Bao Buns – Crispy Chinese Red Bean Buns
Ingredients
For the Dough
- 300 g all-purpose flour
- 3 g high-sugar-tolerant instant yeast
- 3 g fine white sugar
- 1 large egg
- 140 g iced milk or cold water
- 20 g unsalted butter softened
For Filling & Frying
- 150 g red bean paste
- 100 g golden breadcrumbs
- Water for brushing
- Neutral cooking oil e.g., vegetable, peanut, for deep frying
Instructions
Make the dough
- In a large bowl, crack in the egg and add the high-sugar-tolerant yeast, granulated sugar, and cold milk. Stir with chopsticks until the yeast begins to dissolve evenly.
- Add the all-purpose flour and mix until a shaggy dough forms with no dry flour remaining.
- Add the softened butter and knead by hand until incorporated.
- Transfer the dough to a work surface and knead until smooth, elastic, and no longer sticky, about 10 minutes.
Shape and fill
- Roll the dough into a log and divide evenly into 8 portions.
- Roll each portion into a smooth ball.
- Flatten each ball with a rolling pin into a round wrapper, keeping the center slightly thicker and the edges thinner.
- Place about 25 g of red bean paste in the center of each wrapper.
- Gather the edges toward the center, pinch tightly to seal, and gently shape into a round bun.
- Lightly roll each filled bun with a rolling pin to flatten slightly, about 1 cm thick. Avoid making them too thick so they fry evenly.
Coat and proof
- Dip the bun into a bowl of water to lightly moisten the surface, then remove it immediately.
- Roll in breadcrumbs and gently press so the crumbs adhere evenly.
- Place the coated buns on a board, cover with plastic wrap, and let them proof in a warm place until they expand to about 1.5 times their original size. Proper proofing ensures a light and fluffy interior after frying.
Fry until golden
- Heat cooking oil in a wok or deep pan to a depth of about 5 cm. Heat to medium-low, around 150–160°C. When chopsticks inserted into the oil produce steady bubbles, the oil is ready.
- Gently add the proofed buns and fry over low heat, turning carefully with a slotted spoon so they cook evenly. Fry until both sides are golden brown and puffed, about 3–4 minutes.
- Remove and drain on paper towels to absorb excess oil. Let rest for 2 minutes before serving.


Leave a Reply