This Xue Mei Niang (Mango Pomelo Sago Mochi) recipe is a modern twist on a classic Chinese dessert. Soft mochi skin wrapped around a fruity, creamy filling — ideal for a snack or dessert!
What is Xue Mei Niang (Mango Pomelo Sago Mochi)")
Xue Mei Niang (雪媚娘), which directly translates to “Snow Beauty” or “Snow Charming Lady,” is a popular modern Chinese dessert.
It’s essentially a type of fresh, soft mochi from Chinese patisserie, known for its elegant appearance and delightful contrast in textures.
In English, there isn’t a perfect equivalent, but I like to call it Mango Pomelo Sago Mochi.
Xue Mei Niang is super popular in China, and as a die-hard mochi fan, I’ve always noticed how much it reminds me of Japanese daifuku — soft, chewy glutinous rice on the outside, packed with a generous, flavorful filling.
Inspired by the classic dessert Mango Pomelo Sago, I transformed its refreshing flavors into the filling for these mochi.")
Ingredients and Substitutions
For the Mochi Skin
- Glutinous rice flour – Regular glutinous rice flour works perfectly here for a soft and chewy texture.
- Cornstarch – This helps with structure and elasticity, making the skin easier to handle and less sticky. It also improves the stretch of the dough and should not be replaced with other starches.
- Fine granulated sugar – Adds gentle sweetness and a subtle aroma to the skin. You can slightly reduce the amount if you prefer a less sweet mochi.
- Milk – Whole milk is ideal for added richness and moisture, giving the skin a softer bite. Skim milk can be used if needed, though the flavour will be lighter.
- Butter – Softened butter is essential for keeping the mochi skin moist and elastic. It helps prevent the skin from hardening after chilling and should not be omitted.
- Cooked glutinous rice flour – Used for dusting to prevent sticking. Raw glutinous rice flour is toasted in a dry pan until lightly golden.
Mango Pomelo Sago Filling
- Whipping cream – Use dairy whipping cream with at least 35% fat for a smooth, stable, and silky texture after whipping.
- Fine granulated sugar – Sweetens the cream without overpowering the fruit flavours. Adjust to your preference.
- Mango purée – Intensifies the mango flavour. Use pure mango purée with no additives, or mash fresh mango if needed.
- Mango – Choose ripe, soft mango for natural sweetness and aroma. Cut into small cubes for the best texture.
- Pomelo – Adds a refreshing, slightly tart contrast and visual appeal. Red pomelo can be used as a substitute.
- Sago pearls – Cooked until translucent and chewy, sago adds extra texture and makes the filling more interesting. It can be omitted if unavailable.
How to Make Mango Pomelo Sago Mochi
Prep Work
Cook the Sago: Bring a pot of water to a rolling boil. Add the sago pearls and cook according to package directions, usually boiling until translucent with a tiny white dot, then covering to steam until fully clear. Rinse under cold water, drain well, and set aside. For step-by-step instructions, check out my detailed guide on how to cook sago.
Prepare the Fruit: Cut the mango into small cubes. Carefully peel the pomelo segments, removing as much of the bitter white pith as possible, and break them into small pieces.
Make Toasted Flour: In a dry skillet over medium-low heat, toast about 1/2 cup of raw glutinous rice flour, stirring constantly, until it is fragrant and turns a very pale sandy color (3-5 minutes). Let it cool completely. This is your non-stick dusting flour.
Make the Xue Mei Niang Skin
In a large bowl, combine glutinous rice flour, cornstarch, and fine sugar. Mix evenly.
Add the milk and stir until smooth and completely lump-free.
Strain the batter once through a sieve to ensure a silky texture.
Cover the bowl with plastic wrap and poke a few small holes to prevent condensation from dripping back onto the batter. Steam over boiling water on high heat until the dough is fully set and semi-translucent.
Remove from the steamer and immediately add the softened butter while the dough is still hot. Mix thoroughly until the butter is fully absorbed.
When the dough cools to warm and no longer hot to the touch, put on disposable gloves and repeatedly stretch, fold, and knead the dough until smooth and elastic. The dough should be able to stretch into a thin membrane — this step is key to keeping the skin soft for days.

Place the finished dough into a sealed bag and refrigerate to relax.
Whip the Cream
In a chilled bowl, add the whipping cream, sugar, and mango purée. Whip on medium speed until clear lines form and soft peaks appear. Do not overwhip.
Transfer the whipped cream to a piping bag and keep refrigerated until ready to assemble.
Assemble the Xue Mei Niang
Dust the work surface with cooked glutinous rice flour. Divide the chilled mochi dough into equal portions.
Lightly coat one portion in cooked flour and roll it into a round wrapper, slightly thicker in the center and thinner at the edges.
Place the wrapper into a mold or small bowl. Pipe a layer of whipped cream, add mango cubes, pomelo pieces, and sago, then cover with another layer of cream. Avoid overfilling.


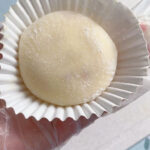
Gather the edges toward the center and pinch tightly to seal. Trim excess dough if needed. Flip the mochi over and lightly dust the seam with cooked glutinous rice flour.

Repeat with the remaining dough. Chill the finished xue mei niang before serving for the best texture.")
Tips & Tricks
- Knead the Dough While Warm: The single most important step for a soft, chewy, non-hardening mochi skin is kneading the warm dough with butter until it becomes extremely smooth and elastic. Don’t rush this step.
- Use Gloves and Toasted Flour: Mochi dough is famously sticky. Wearing disposable food-safe gloves and using a generous amount of toasted glutinous rice flour makes the assembly process clean and easy.
- Keep the Cream Cold: Ensure your heavy cream, bowl, and beaters are very cold for quick and stable whipping. If your kitchen is warm, place the bowl of whipped cream in the fridge for a few minutes if it starts to soften during assembly.
- Don’t Overfill: It’s tempting to pack in the fruit, but overfilling is the main cause of leaking or bursting mochi. A moderate amount of filling ensures a clean seal.
- Seal Tightly: Take your time to pinch the gathered dough together thoroughly, twisting if necessary, to create a tight seal that won’t open in the fridge.
Frequently Asked Questions
Why did my mochi skin turn out hard and not chewy?
This almost always happens if the dough was not kneaded enough while it was still warm, or if not enough butter was incorporated. The kneading process is essential for developing the right texture.
My mochi is incredibly sticky and impossible to handle. What went wrong?
You likely did not use enough toasted glutinous rice flour for dusting during the rolling and assembly stage. Don’t be shy with it—it’s your best friend. Also, ensure the dough has rested and is at room temperature, not cold from the fridge, when you start to assemble.
Can I make these without a steamer?
You can steam the dough in a microwave for a quicker method. Mix the batter in a microwave-safe bowl, cover loosely, and microwave in 1-minute intervals, stirring well between each, until the dough is cooked through (usually 2-3 minutes total). Then proceed with adding butter and kneading.
Can I use other fillings?
Absolutely! This method is versatile. You can fill the mochi with straight sweet red bean paste, a plain whipped cream and strawberry mixture, or even a scoop of firm ice cream (eat immediately if using ice cream).
How do I store leftovers?
Store in an airtight container in the refrigerator for 1-2 days. The mochi skin will gradually lose its softest, freshest texture but will still be delicious. They are not suitable for freezing with this cream-based filling.
Soft Mochi with Mango Pomelo Sago Filling
Ingredients
For the Mochi Skin
- 100 g glutinous rice flour
- 30 g cornstarch
- 20 g fine granulated sugar
- 160 g whole milk
- 20 g unsalted butter softened
- Toasted glutinous rice flour for dusting
For the Mango Pomelo Sago Filling
- 200 g heavy whipping cream very cold
- 20 g fine granulated sugar
- 40 g mango jam or smooth mango puree
- 1 ripe mango about 200g, cut into 1cm cubes
- 1/4 pomelo or ruby grapefruit, segments peeled and separated
- 30 g sago pearls cooked according to package directions
Instructions
Prep Work
- Cook the Sago: Bring a pot of water to a rolling boil. Add the sago pearls and cook according to package directions, usually boiling until translucent with a tiny white dot, then covering to steam until fully clear. Rinse under cold water, drain well, and set aside. For step-by-step instructions, check out my detailed guide on how to cook sago.
- Prepare the Fruit: Cut the mango into small cubes. Carefully peel the pomelo segments, removing as much of the bitter white pith as possible, and break them into small pieces.
- Make Toasted Flour: In a dry skillet over medium-low heat, toast about 1/2 cup of raw glutinous rice flour, stirring constantly, until it is fragrant and turns a very pale sandy color (3-5 minutes). Let it cool completely. This is your non-stick dusting flour.
Make the Xue Mei Niang Skin
- In a large bowl, combine glutinous rice flour, cornstarch, and fine sugar. Mix evenly.
- Add the milk and stir until smooth and completely lump-free.
- Strain the batter once through a sieve to ensure a silky texture.
- Cover the bowl with plastic wrap and poke a few small holes to prevent condensation from dripping back onto the batter. Steam over boiling water on high heat until the dough is fully set and semi-translucent.
- Remove from the steamer and immediately add the softened butter while the dough is still hot. Mix thoroughly until the butter is fully absorbed.
- When the dough cools to warm and no longer hot to the touch, put on disposable gloves and repeatedly stretch, fold, and knead the dough until smooth and elastic. The dough should be able to stretch into a thin membrane — this step is key to keeping the skin soft for days.
- Place the finished dough into a sealed bag and refrigerate to relax.
Whip the Cream
- In a chilled bowl, add the whipping cream, sugar, and mango purée. Whip on medium speed until clear lines form and soft peaks appear. Do not overwhip.
- Transfer the whipped cream to a piping bag and keep refrigerated until ready to assemble.
Assemble the Xue Mei Niang
- Dust the work surface with cooked glutinous rice flour. Divide the chilled mochi dough into equal portions.
- Lightly coat one portion in cooked flour and roll it into a round wrapper, slightly thicker in the center and thinner at the edges.
- Place the wrapper into a mold or small bowl. Pipe a layer of whipped cream, add mango cubes, pomelo pieces, and sago, then cover with another layer of cream. Avoid overfilling.
- Gather the edges toward the center and pinch tightly to seal. Trim excess dough if needed. Flip the mochi over and lightly dust the seam with cooked glutinous rice flour.
- Repeat with the remaining dough. Chill the finished xue mei niang before serving for the best texture.


Leave a Reply