This peanut sauce is my absolute favorite for dumpling dipping, and once you try it, I think you’ll love it too.
It has that perfect balance of nutty richness and subtle sweetness, making it a crowd-pleaser every time.
Made with only pure peanuts, a touch of sugar and salt, and no additives, it’s completely natural and wholesome.")
But what I love most about this peanut sauce is its versatility.
Spread it on warm bread for a comforting snack, toss it with noodles for a quick and flavorful meal, or serve it as a dip for hot pot or steamed vegetables.
Compared to store-bought peanut butter or sauces, this homemade version is healthier, more aromatic, and truly satisfying.
Plus, you can customize the texture exactly how you like it—smooth and creamy or slightly chunky for that rustic, homemade feel.")
")
Ingredients and Substitutions
- Raw peanuts – I always suggest using full, high-quality peanuts without any spoiled kernels. This ensures the sauce is aromatic and flavorful.
- Granulated sugar – Adds a touch of sweetness and balances the peanut flavor. You can adjust the amount to your taste.
- Salt – Enhances the flavor and balances sweetness, making the peanut sauce more rounded and delicious.
- Cooked oil – Helps the peanut sauce become creamy and smooth. Neutral oils like corn oil or peanut oil are ideal. If unavailable, melted butter works as a substitute and adds a richer flavor.
How to Make Homemade Chinese Peanut Sauce
1. Clean and Roast the Peanuts
Rinse the raw peanuts thoroughly to remove any dirt or debris. Drain completely to avoid splattering or uneven roasting.
Spread the peanuts evenly on a baking tray, ensuring they are not overlapping.
Roast in the oven for 25 minutes. At the halfway point (around 12 minutes), stir the peanuts with chopsticks to ensure even roasting.
2. Remove Skins
Allow the roasted peanuts to cool until safe to handle.
Rub them gently between your hands to remove the red skins. You can also shake them in a sieve to separate skins from the peanuts. Leaving a little skin is optional—it does not affect flavor, only color.
3. Blend into Peanut Sauce
Place the peeled peanuts into a high-speed blender or food processor. Add the sugar and salt. Start blending.
If the blender struggles, pause and stir the peanuts with chopsticks to prevent clumping.
Once the peanuts reach a coarse, chunky texture, add the cooked oil.
Continue blending until the peanut sauce reaches your desired smoothness.
For a chunky texture: blend less.
For a smooth, creamy texture: blend 1–2 minutes longer.
4. Storage & Usage
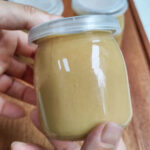
Allow the peanut sauce to cool completely. Transfer it to a clean, dry, airtight jar.
Room temperature: store up to 1 week
Refrigerated: store up to 1 month
Tips & Tricks
Roasting peanuts:
Ensure the peanuts are fully drained before roasting to avoid uneven cooking. Adjust oven temperature and time as needed. If the peanuts brown too quickly, reduce the heat to 170°C to prevent burning and bitterness.
Achieving smooth texture:
Do not overload the blender. Adding cooked oil is key—it helps the peanuts release their natural oils and creates a smoother sauce. Adjust oil based on how dry the peanuts are. If still dry after blending, add a small amount more oil.
Texture adjustments:
Blend for less time for a coarse, chunky sauce or longer for a creamy, smooth sauce.
Can I use already roasted peanuts?
Yes, you can use unsalted, dry-roasted peanuts to skip the roasting and peeling steps. However, the flavor won’t be as deep and fresh as when you roast them yourself, and you have less control over the salt level.
Why is my peanut butter not getting smooth?
This is usually due to the power of your appliance. A high-powered blender or food processor is key. If your machine is struggling, make sure to stop and scrape down the sides frequently. Adding the full amount of oil should help it along. Very dry or old peanuts may also release less of their own oil.
Do I have to add the extra oil?
Technically, no. If you use very fresh, high-quality peanuts and have a powerful machine, they will release enough of their own oil to become creamy. However, the added oil guarantees a smooth, spreadable consistency and helps prevent the butter from being too stiff, especially after refrigeration.
My peanut butter is very runny after blending. What happened?
The peanuts were likely over-roasted. When peanuts roast for too long, more of their internal structure breaks down, releasing an excess of their natural oils, which can make the final butter thinner. It will thicken up significantly once cooled, especially in the fridge.
Is it normal for oil to separate on top in the jar?
Yes, this is completely natural and a sign of a pure, non-homogenized product. Simply stir the oil back in before you use it. Storing it in the refrigerator will slow down this separation.
Versatile Chinese Peanut Sauce – Smooth or Chunky, Easy to Make
Ingredients
- 500 g raw shelled peanuts
- 20 g granulated white sugar
- 3 g fine salt
- 50 g neutral-tasting oil e.g., corn, peanut, or grapeseed oil
Instructions
Clean and Roast the Peanuts
- Rinse the raw peanuts thoroughly to remove any dirt or debris. Drain completely to avoid splattering or uneven roasting.
- Spread the peanuts evenly on a baking tray, ensuring they are not overlapping.
- Roast in the oven for 25 minutes. At the halfway point (around 12 minutes), stir the peanuts with chopsticks to ensure even roasting.
Remove Skins
- Allow the roasted peanuts to cool until safe to handle.
- Rub them gently between your hands to remove the red skins. You can also shake them in a sieve to separate skins from the peanuts. Leaving a little skin is optional—it does not affect flavor, only color.
Blend into Peanut Sauce
- Place the peeled peanuts into a high-speed blender or food processor. Add the sugar and salt. Start blending.
- If the blender struggles, pause and stir the peanuts with chopsticks to prevent clumping.
- Once the peanuts reach a coarse, chunky texture, add the cooked oil.
- Continue blending until the peanut sauce reaches your desired smoothness.
- For a chunky texture: blend less.
- For a smooth, creamy texture: blend 1–2 minutes longer.
Storage & Usage
- Allow the peanut sauce to cool completely. Transfer it to a clean, dry, airtight jar.
- Room temperature: store up to 1 week
- Refrigerated: store up to 1 month


Leave a Reply