This Snow Pear & Snow Fungus Dessert Soup is one of my all-time favorite Chinese sweet soups, perfect for chilly autumn and winter days.
What is Snow Fungus?
Snow fungus, also known as white fungus or Tremella, is a popular ingredient in Chinese dessert soup. It has a naturally gelatinous texture when cooked, making it perfect for sweet soups.
I used organic snow fungus for this recipe, which requires no soaking. If you’re using regular dried snow fungus, soak it until soft and then tear it into small pieces before cooking.")
There are so many types of tong sui (Chinese sweet soups), such as Sweet Potato Sago Dessert Soup, Water Chestnut Dessert Soup, and Green Bean & Sweet Potato Soup—all comforting and nourishing in their own way.
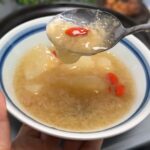
For me, Snow Pear & Snow Fungus Soup is my absolute favorite. Whenever I attend a banquet, I often wait eagerly for the final dessert, hoping it will be this very soup.
And I always make sure not to waste the pear skins, which I simmer to add extra flavor and nutrition.")
Ingredients and Substitutions
- Snow Pears / Fragrant Pears – I recommend using any variety that is juicy and sweet. I used smaller snow pears, so I didn’t cut them into chunks—they can be cooked whole if you prefer. The pear skin is essential here—don’t discard it! We’ll boil it first to extract maximum flavor and nutrients into the soup base.
- Organic Snow Fungus (燕耳) – I always suggest using this “premium” variety if you can find it. It’s pre-cleaned, requires no soaking, and releases its gelatin much faster, giving you that rich, silky texture in minimal time. If unavailable, regular dried snow fungus works perfectly—it just needs a longer soak and cook time.
- Red Dates – These add a natural, caramel-like sweetness and a nutritional boost.
- Goji Berries – A small handful adds a pop of color, a slight sweetness, and their renowned beneficial properties. They only need a quick rinse and a brief steep at the end.
- Rock Sugar – This is my preferred sweetener for this soup as it dissolves clearly and provides a clean, gentle sweetness that doesn’t overpower the pears. Adjust the amount based on how sweet your fruit is.
- Brown Sugar – This is an optional ingredient I like to add just at the end. A small amount enhances the depth of flavor and adds a subtle malty richness without making the soup overly sweet.
- Salt – You’ll just need a pinch for scrubbing the pear skins clean, which helps remove any surface wax or residue.
How to Make Snow Pear and Snow Fungus Soup
Prepare the Ingredients
Wash the pears thoroughly. Rub their skins with a pinch of salt, then rinse under water. Peel the pears using a vegetable peeler, taking care to keep the long strips of peel. Set the peel aside. Core the pears. Rinse the red dates and goji berries separately. If using regular dried snow fungus, ensure it has been soaked for at least 2 hours in cold water and then torn into small florets.

Boil the Pear Skins
Place the reserved pear skins in a medium-sized soup pot. Add enough water to cover them by about an inch. Bring to a boil over high heat, then reduce the heat to low and let it simmer gently for 10 minutes. This step infuses the water with a wonderful pear essence and nutrients. After 10 minutes, use a slotted spoon to remove and discard all the pear skins. You will be left with a fragrant pear-skin broth in the pot.
Simmer the Soup
Add pear chunks, red dates, and snow fungus to the pot.
Add rock sugar according to taste, then pour in the pear skin water.
Bring to medium-high heat until boiling, then reduce to low heat. Leave a small gap in the pot to prevent overflow.
Simmer for 20 minutes, until the pears are soft and the snow fungus has released its gelatin.
Optionally, add brown sugar and stir to dissolve.
Add goji berries and allow the residual heat to infuse for 2 minutes.")
Tips & Tricks
- Maximize Gelatin Release: The secret to a silky soup is low, slow heat. A vigorous boil can prevent the snow fungus from properly releasing its gelatin. If using regular snow fungus, ensure it’s thoroughly soaked and torn into small, uniform pieces for the best texture.
- Don’t Waste the Pear Skins: Boiling the skins first is a non-negotiable step for me. It builds a deeply flavorful base and incorporates more nutrients, making the final soup taste truly of pears.
- Add Sugars Strategically: Use rock sugar during simmering to sweeten the broth base. Add brown sugar (if using) at the very end to preserve its distinct flavor and aroma. Always taste before serving and adjust sweetness as needed.
- Customize Your Bowl: This soup is a fantastic canvas. Try adding a spoonful of sweet osmanthus syrup at the end, or simmering a pandan leaf with the pears for a fragrant twist.
Frequently Asked Questions
Can I make this soup in advance?
Absolutely. This soup stores and reheats beautifully. Let it cool completely, then store it in an airtight container in the refrigerator for up to 4 days. The flavor often improves the next day. Reheat gently on the stove or in the microwave.
My soup isn’t thick or gelatinous. What went wrong?
If using regular snow fungus, it may need a longer simmering time (up to 40-50 minutes on low heat). Also, ensure you used enough snow fungus relative to the water. Different brands and types vary in their gelatin-releasing power.
Is it okay to eat the snow fungus and pears?
Yes, definitely! The softened snow fungus and tender pears are meant to be eaten and are packed with dietary fiber and nutrients. They are the best part of the soup.
Can I use a slow cooker or pressure cooker?
Yes. For a slow cooker, combine all ingredients (except goji berries and brown sugar) and cook on LOW for 4-6 hours. Add the final ingredients in the last 30 minutes. For a pressure cooker (like an Instant Pot), cook on High Pressure for 15-20 minutes with a natural release, then finish as directed.
Easy Chinese Snow Pear & White Fungus Soup
Ingredients
- 8 snow pears or fragrant pears
- 1 portion organic snow fungus 燕耳, or regular dried snow fungus (soaked)
- A handful of red dates optional
- 1 tablespoon goji berries
- Rock sugar to taste (start with 2-3 tablespoons)
- 1 small piece brown sugar optional
- A pinch of salt
- Water as needed
Instructions
Prepare the Ingredients
- Wash the pears thoroughly. Rub their skins with a pinch of salt, then rinse under water. Peel the pears using a vegetable peeler, taking care to keep the long strips of peel. Set the peel aside. Core the pears. Rinse the red dates and goji berries separately. If using regular dried snow fungus, ensure it has been soaked for at least 2 hours in cold water and then torn into small florets.
Boil the Pear Skins
- Place the reserved pear skins in a medium-sized soup pot. Add enough water to cover them by about an inch. Bring to a boil over high heat, then reduce the heat to low and let it simmer gently for 10 minutes. This step infuses the water with a wonderful pear essence and nutrients. After 10 minutes, use a slotted spoon to remove and discard all the pear skins. You will be left with a fragrant pear-skin broth in the pot.
Simmer the Soup
- Add pear chunks, red dates, and snow fungus to the pot.
- Add rock sugar according to taste, then pour in the pear skin water.
- Bring to medium-high heat until boiling, then reduce to low heat. Leave a small gap in the pot to prevent overflow.
- Simmer for 20 minutes, until the pears are soft and the snow fungus has released its gelatin.
- Optionally, add brown sugar and stir to dissolve.
- Add goji berries and allow the residual heat to infuse for 2 minutes.


Leave a Reply