Rich but not greasy, soft yet deeply flavorful — this authentic steamed pork belly with preserved mustard greens is made the traditional way. Learn how to achieve perfect tiger skin pork belly using time-honored techniques perfect for family gatherings and festive meals.
This is the kind of dish that instantly brings me back to home.")
")
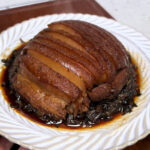
Mei Cai Kou Rou is a classic Chinese steamed pork belly dish that shows up on the table year after year, especially during Chinese New Year and family banquets.
It’s rich yet not greasy, tender without falling apart, and deeply infused with flavour.
I make this using the traditional method I learned from my father, the same way it’s been cooked in my family for decades.
It’s not a shortcut recipe — it’s the real thing.
The pork is boiled, fried, soaked, and finally steamed until the fat melts into the preserved mustard greens and the skin turns beautifully wrinkled and golden.
I always make a large batch because it stores so well.
Whenever we want to eat it, all it needs is another steam, and it tastes just as good — sometimes even better.")
Ingredients and Substitutions
- Skin-on Pork Belly – You must use a skin-on, well-marbled cut. The skin is essential for creating the signature “tiger-skin” texture during frying, and the layers of fat and lean meat ensure the final result is succulent and not dry.
- Preserved Mustard Greens (Meicai) – I recommend seeking out dried, salted mustard greens made from mustard leaf (芥菜). They provide the authentic, deep, fermented flavor that defines the dish. If unavailable, you can substitute with Sichuan yacai (preserved mustard tuber) or another type of dried salted vegetable, though the flavor profile will vary slightly.
- Light Soy Sauce – We use this as the main seasoning in the sauce for its color and umami. It’s important for flavor but be mindful of saltiness, especially if your preserved vegetables are very salty.
- Sugar – A bit of sugar is crucial to balance the savory and salty elements. We use it in both the seasoning sauce and when stir-frying the mustard greens to round out the flavor.
- Cooking Wine – Used during boiling and in the sauce, its primary role is to remove any gaminess from the pork and add a layer of aromatic depth.
- Scallions & Ginger – These are your aromatic workhorses for the boiling step, fundamental for creating a clean, fragrant base for the pork.
How to Make Steamed Pork Belly with Preserved Mustard Greens
Step 1: Boil the Pork Belly
Wash the skin-on pork belly and cut it into four equal pieces. Place the pork into a pot with cold water, then add scallions, ginger, and cooking wine.
Bring to a boil over high heat, skim off any foam, then reduce to medium heat and boil for about 15 minutes, until a chopstick can easily pierce through the skin.
Remove the pork and drain well. Reserve the cooking liquid. Pat the pork skin completely dry with kitchen paper, then use a toothpick to densely prick the skin. This step helps the skin blister properly during frying.
Step 2: Frying and Soaking the Pork
Heat a generous amount of cooking oil in a wok until about 60% hot. Carefully add the dried pork belly pieces and immediately cover the wok with a lid to prevent oil splatter.
Fry until the crackling sound subsides, then uncover, turn the pork, and continue frying until lightly golden on all sides. Remove and drain.
Pour the reserved pork-boiling liquid into a container with the fried pork. Let it soak for 40 minutes. You will see the skin start to soften and form small bubbles.

After soaking, remove the pork and pat the skin dry again. Reheat the oil to a higher temperature (190°C/375°F). Fry only the skin side of the pork belly for 2-3 minutes until it is deeply golden, blistered, and wrinkled—this is the “tiger-skin.” Drain well.
Step 3: Prepare the Preserved Mustard Greens and Sauce
Soak the preserved mustard greens in water for 10 minutes, rinse thoroughly, then squeeze dry.
Heat a little oil in a wok, add chopped scallions, then add the mustard greens and sprinkle in part of the sugar. Stir-fry for 2–3 minutes until very fragrant. Set aside.
In a small bowl, combine light soy sauce, salt, sugar, and cooking wine. Stir until well mixed.
Step 4: Assemble and Steam
Slice the pork belly thinly.
Arrange the slices skin-side down neatly into a large bowl.
Pour the prepared sauce evenly over the pork, making sure every slice is coated.
Spread the stir-fried mustard greens on top and press gently.
Place the bowl into a steamer with boiling water. Cover the bowl with a plate to prevent condensation from dripping in. Steam over medium heat for 1 hour, until the pork is extremely tender.
Step 5: Invert and Serve
Carefully remove the bowl from the steamer. Let it rest for 3-5 minutes. Place your serving plate firmly over the top of the bowl. In one confident motion, flip the plate and bowl over. Gently lift the bowl away to reveal the perfectly presented dish with the glossy, golden “tiger-skin” pork now on top. Serve immediately.

Tips & Tricks
- Dry the pork skin thoroughly before frying — moisture will prevent proper blistering.
- Prick the skin densely but don’t pierce into the meat; this helps create even tiger skin.
- Do not skip the soaking step after the first fry. This is essential for the skin to puff and wrinkle.
- Always cover the wok when frying to avoid dangerous oil splatter.
- Steam long enough so the fat fully melts into the mustard greens, keeping the dish rich but not greasy.
Frequently Asked Questions
Why isn‘t my pork skin blistered?
The skin may not have been dry enough, pricked thoroughly, or soaked long enough after the first fry. All three steps are essential.
Can I make this dish ahead of time?
Yes. This dish stores very well. Simply refrigerate or freeze it, then steam again before serving.
Why does my pork taste greasy?
The steaming time may have been too short. Steaming allows the fat to render and absorb into the preserved greens, balancing the richness.
Is deep frying necessary?
Yes. For traditional Mei Cai Kou Rou, deep frying is essential for achieving tiger skin and authentic texture.
Traditional Mei Cai Kou Rou (Steamed Pork Belly with Preserved Mustard Greens)
Ingredients
Main Ingredients
- 2000 g skin-on pork belly
- 150 g preserved mustard greens Mei Gan Cai
Ingredients for Boiling the Pork
- 3-4 scallions cut into large sections
- 5-6 slices ginger
- 3 tablespoons cooking wine
Sauce Ingredients
- 60 ml light soy sauce
- 2 tbsp white sugar
- 1 tbsp cooking wine
- 1 tsp salt
Other Ingredients
- Cooking oil
- Chopped scallions
Instructions
Step 1: Boil the Pork Belly
- Wash the skin-on pork belly and cut it into four equal pieces. Place the pork into a pot with cold water, then add scallions, ginger, and cooking wine.
- Bring to a boil over high heat, skim off any foam, then reduce to medium heat and boil for about 15 minutes, until a chopstick can easily pierce through the skin.
- Remove the pork and drain well. Reserve the cooking liquid. Pat the pork skin completely dry with kitchen paper, then use a toothpick to densely prick the skin. This step helps the skin blister properly during frying.
Step 2: Frying and Soaking the Pork
- Heat a generous amount of cooking oil in a wok until about 60% hot. Carefully add the dried pork belly pieces and immediately cover the wok with a lid to prevent oil splatter.
- Fry until the crackling sound subsides, then uncover, turn the pork, and continue frying until lightly golden on all sides. Remove and drain.
- Pour the reserved pork-boiling liquid into a container with the fried pork. Let it soak for 40 minutes. You will see the skin start to soften and form small bubbles.
- After soaking, remove the pork and pat the skin dry again. Reheat the oil to a higher temperature (190°C/375°F). Fry only the skin side of the pork belly for 2-3 minutes until it is deeply golden, blistered, and wrinkled—this is the "tiger-skin." Drain well.
Step 3: Prepare the Preserved Mustard Greens and Sauce
- Soak the preserved mustard greens in water for 10 minutes, rinse thoroughly, then squeeze dry.
- Heat a little oil in a wok, add chopped scallions, then add the mustard greens and sprinkle in part of the sugar. Stir-fry for 2–3 minutes until very fragrant. Set aside.
- In a small bowl, combine light soy sauce, salt, sugar, and cooking wine. Stir until well mixed.
Step 4: Assemble and Steam
- Slice the pork belly thinly.
- Arrange the slices skin-side down neatly into a large bowl.
- Pour the prepared sauce evenly over the pork, making sure every slice is coated.
- Spread the stir-fried mustard greens on top and press gently.
- Place the bowl into a steamer with boiling water. Cover the bowl with a plate to prevent condensation from dripping in. Steam over medium heat for 1 hour, until the pork is extremely tender.
Step 5: Invert and Serve
- Carefully remove the bowl from the steamer. Let it rest for 3-5 minutes. Place your serving plate firmly over the top of the bowl. In one confident motion, flip the plate and bowl over. Gently lift the bowl away to reveal the perfectly presented dish with the glossy, golden "tiger-skin" pork now on top. Serve immediately.


Leave a Reply