These soft steamed wheat buns are filled with sweet, glutinous purple rice and made with simple pantry ingredients. No oven needed — just a steamer! Fluffy, fragrant, and perfect for breakfast or snacks.")
")
My family and I absolutely love anything made with dough, and buns are especially close to our hearts.
I enjoy making all kinds of buns — whether they’re baked, like Pork Floss Buns or Crispy Baked Beef Buns, steamed ones such as Purple Sweet Potato Buns, Steamed Carrot Buns, Black Sesame Mantou Rolls, or Sweet Potato Mantou., or even pan-fried varieties like Crispy Pan-Fried Pork Buns (Sheng Jian Bao).
I’ve shared so many bun recipes over on nanawithchopstick, and I’m truly happy to finally share this whole wheat steamed bun recipe with you.
How to Fold Bao
If you’re a beginner, don’t worry at all — I started exactly the same way. Folding buns takes practice, and practice really does make perfect. I’ve made a step-by-step folding video to guide you through the process, which you can follow along with at your own pace.
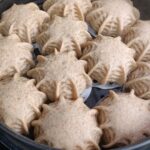
After folding, I like to use a mold to shape the buns, similar to walnut buns, but this step is completely optional. If you don’t have a mold, simply skip it — the buns will still be beautiful and delicious.")
Filling Options
Much like mochi, one of the reasons I love making buns so much is that once you master the dough, the filling options are truly endless.
For alternative fillings, you might try:
")
Why You’ll Love This Recipe
- Perfect Texture Contrast: You get the best of both worlds—a soft, slightly chewy, and fluffy steamed dough wrapped around a sweet, dense, and satisfyingly sticky purple rice filling.
- Beginner-Friendly & Approachable: Made without complex techniques or special equipment. The dough is mixed by hand and steamed in a regular pot, making the process clear and achievable.
- Make-Ahead Convenience: Both the filling and the finished buns can be prepared in advance. The filling is made ahead, and the buns freeze beautifully for a ready-to-steam treat anytime.
- Customizable & Forgiving: The recipe includes helpful tips for success at every stage, from getting the perfect rice texture to mastering the proofing of the dough, ensuring great results.
Ingredients and Substitutions
- Purple Rice – This is the star of the filling. Soaking it overnight is non-negotiable for achieving the desired soft, sticky, and slightly chewy texture. Skipping this step will result in hard, undercooked grains.
- Sugar – We use it in both the filling and the dough. In the filling, it adds the primary sweetness, and in the dough, it provides a subtle flavour and feeds the yeast for a better rise.
- Sweetened Condensed Milk – I recommend adding this to the filling if you have it. It contributes a wonderful creamy richness and a deeper, caramelized sweetness that plain sugar can’t provide. It’s optional, but highly recommended.
- Whole Wheat Flour & All-Purpose Flour – Using a blend gives the buns a lovely, nuanced flavour and a heartier texture than using only all-purpose flour, while still keeping the dough light.
- Yeast – This is what makes the dough rise and become airy. Ensure it’s active and not expired for the best results.
- Warm Water – The temperature is crucial. I recommend water that feels warm but not hot to the touch (about 30-35°C). Too hot will kill the yeast; too cold will slow it down.
- Lard – A small amount makes a significant difference. It tenderizes the dough, giving the steamed buns a softer texture and a beautiful sheen. If you don’t have it, a neutral cooking oil like vegetable or corn oil works, or butter for a different flavour profile.
How to Make Steamed Purple Rice Buns
Step 1: Make the Purple Rice Filling (The Night Before)
- Soak: Place 150g of purple rice in a bowl and cover with plenty of cold water. Let it soak at room temperature for at least 8 hours, or overnight.
- Cook: The next day, drain and rinse the rice. Transfer it to a rice cooker or pot, add 300ml of fresh water, and cook until tender and all water is absorbed (use the “white rice” setting on a rice cooker).

- Season: While the rice is still hot, immediately add 30g of sugar and the packet of sweetened condensed milk (if using). Stir vigorously until everything is well combined and the mixture is sticky.
- Shape: Let the mixture cool until it’s easy to handle. Then, portion and roll it into balls, each weighing about 30g. Set them aside on a plate.

Step 2: Make and Proof the Dough
- Mix Dry Ingredients: In a large mixing bowl, combine 100g whole wheat flour, 200g all-purpose flour, 3g yeast, and 10g sugar. Whisk together.
- Add Liquid: Gradually pour in 160g of warm water. Use chopsticks or a fork to stir until a shaggy dough forms with no dry flour remaining.

- Add Fat & Knead: Add the spoonful of lard (or oil) to the bowl. Use your hands to work it into the dough initially, then turn the dough out onto a clean, un-floured surface. Knead vigorously for about 10 minutes until the dough is very smooth, elastic, and no longer sticky.
 to the bowl")


- Portion: Shape the dough into a log and cut it into equal pieces, each weighing about 40g. Cover them with a damp cloth to prevent drying.

Step 3: Assemble the Buns
- Shape Wrappers: Take one piece of dough and use a rolling pin to flatten it into a round disc, about 3-4 inches in diameter. The center should be slightly thicker than the edges to prevent the bun from bursting when steaming.

- Fill and Seal: Place one 30g purple rice ball in the center. Gather the edges of the dough around the filling, pleating as you go (like wrapping a baozi). Pinch the top firmly to seal completely.

- Final Shape: Place the bun seam-side down on the counter. Gently cup your hands around it and rotate to form a neat, round shape. If desired, lightly press the bun with a round mold to create a decorative pattern.


Step 4: Final Proof and Steam
- Prepare Steamer: Line your steamer baskets with parchment paper.
- Final Proof: Place the shaped buns in the steamer, leaving about 2 inches of space between them as they will expand. Cover with the lid and let them proof in a warm, draft-free place for 30-40 minutes. They are ready when they look puffy and feel light; a gentle poke will leave a slight indentation that slowly springs back.

- Steam: Bring the water in your steamer to a rolling boil over high heat. Once boiling, place the proofed buns (in their baskets) on top. Steam on medium-high heat for 12 minutes.
- Rest: Crucial Step: After 12 minutes, turn off the heat. DO NOT OPEN THE LID. Let the buns sit in the steamer with the lid on for an additional 5 minutes to gradually adjust to the temperature. This prevents them from collapsing.
Tips & Tricks
- Rice Texture is Key: Soaking the purple rice is essential for tenderness. When cooking, use just enough water—too much will turn it into porridge that can’t be shaped into balls.
- Control Your Water Temperature: For activating the yeast perfectly, your warm water should feel like bathwater, not hot. If you have a thermometer, aim for 30-35°C (85-95°F).
- Knead to a Smooth Dough: Taking the time to knead the dough until completely smooth ensures a strong gluten network, which gives the buns their lovely, chewy-yet-soft texture.
- Don’t Rush the Final Proof: This second rise is what makes the buns light and fluffy. If under-proofed, they will be dense; if over-proofed, they may collapse. Look for the visual and tactile cues described.
- The Post-Steam Rest is Non-Negotiable: The sudden temperature change from a hot steamer to a cool room is the main cause of collapsed buns. Letting them rest with the lid on allows the structure to set.
Frequently Asked Questions
Can I make the filling ahead of time?
Absolutely! The purple rice filling can be prepared 2-3 days in advance and stored, covered, in the refrigerator. Let it come to room temperature slightly before shaping into balls for easier handling.
My buns collapsed after steaming. What went wrong?
The most common causes are: 1) Over-proofing the dough before steaming (it loses its structure), or 2) Skipping the 5-minute rest with the lid on after turning off the heat (sudden temperature shock).
Can I freeze these buns?
Yes, they freeze beautifully. Let the steamed buns cool completely, then place them in a single layer on a tray to freeze solid. Once frozen, transfer to a zip-top bag or airtight container. They can be frozen for up to 1 month. Steam directly from frozen for 8-10 minutes to reheat.
I don’t have a steamer. How can I steam these?
You can use a large pot or wok with a lid. Place a heatproof plate or a small rack on top of a couple of small heatproof bowls or a ring of crumpled foil in the bottom of the pot. Add water (making sure it doesn’t touch the plate), bring to a boil, then place your buns (on parchment) on the plate, cover, and steam.
Healthy Steamed Wheat Buns with Sweet Purple Rice
Ingredients
Purple Rice Filling
- 150 g purple rice soaked overnight
- 300 ml water
- 30 g granulated sugar
- 1 packet approx 15-20g sweetened condensed milk (optional)
Dough
- 100 g whole wheat flour
- 200 g all-purpose flour
- 3 g active dry yeast
- 10 g granulated sugar
- 160 g warm water 30-35°C
- 1 small spoonful lard or neutral cooking oil
Instructions
Step 1: Make the Purple Rice Filling (The Night Before)
- Soak: Place 150g of purple rice in a bowl and cover with plenty of cold water. Let it soak at room temperature for at least 8 hours, or overnight.
- Cook: The next day, drain and rinse the rice. Transfer it to a rice cooker or pot, add 300ml of fresh water, and cook until tender and all water is absorbed (use the "white rice" setting on a rice cooker).
- Season: While the rice is still hot, immediately add 30g of sugar and the packet of sweetened condensed milk (if using). Stir vigorously until everything is well combined and the mixture is sticky.
- Shape: Let the mixture cool until it's easy to handle. Then, portion and roll it into balls, each weighing about 30g. Set them aside on a plate.
Step 2: Make and Proof the Dough
- Mix Dry Ingredients: In a large mixing bowl, combine 100g whole wheat flour, 200g all-purpose flour, 3g yeast, and 10g sugar. Whisk together.
- Add Liquid: Make a well in the center and gradually pour in 160g of warm water. Use chopsticks or a fork to stir until a shaggy dough forms with no dry flour remaining.
- Add Fat & Knead: Add the spoonful of lard (or oil) to the bowl. Use your hands to work it into the dough initially, then turn the dough out onto a clean, un-floured surface. Knead vigorously for about 10 minutes until the dough is very smooth, elastic, and no longer sticky.
- Portion: Shape the dough into a log and cut it into equal pieces, each weighing about 40g. Cover them with a damp cloth to prevent drying.
Step 3: Assemble the Buns
- Shape Wrappers: Take one piece of dough and use a rolling pin to flatten it into a round disc, about 3-4 inches in diameter. The center should be slightly thicker than the edges to prevent the bun from bursting when steaming.
- Fill and Seal: Place one 30g purple rice ball in the center. Gather the edges of the dough around the filling, pleating as you go (like wrapping a baozi). Pinch the top firmly to seal completely.
- Final Shape: Place the bun seam-side down on the counter. Gently cup your hands around it and rotate to form a neat, round shape. If desired, lightly press the bun with a round mold to create a decorative pattern.
Step 4: Final Proof and Steam
- Prepare Steamer: Line your steamer baskets with parchment paper.
- Final Proof: Place the shaped buns in the steamer, leaving about 2 inches of space between them as they will expand. Cover with the lid and let them proof in a warm, draft-free place for 30-40 minutes. They are ready when they look puffy and feel light; a gentle poke will leave a slight indentation that slowly springs back.
- Steam: Bring the water in your steamer to a rolling boil over high heat. Once boiling, place the proofed buns (in their baskets) on top. Steam on medium-high heat for 12 minutes.
- Rest: Crucial Step: After 12 minutes, turn off the heat. DO NOT OPEN THE LID. Let the buns sit in the steamer with the lid on for an additional 5 minutes to gradually adjust to the temperature. This prevents them from collapsing.


A really good blog and me back again.