If you don’t have a stand mixer and you’re tired of kneading dough, this is a recipe you have to try.
After making countless buns over the years, I can honestly say this is one of the easiest breads I‘ve ever made.")
The process is incredibly forgiving, with a very low barrier to entry and absolutely no stand mixer required.
It’s low in sugar and completely oil-free, yet still delicious and satisfying, so you can enjoy it without feeling heavy or guilty.
With just 250 g of flour, you can bake one generous artisan loaf that’s far more economical than buying bread from a bakery.
The dough I make has a high hydration, which means there’s no kneading at all.
I usually bake it in an air fryer, but a regular oven works just as beautifully.")
")
Ingredients and Substitutions
- Pure Milk – I use milk to hydrate the dough for a slightly richer flavor and softer crumb compared to water. Whole milk is ideal for the best taste.
- Egg – One egg adds richness, tenderizes the crumb, and contributes to a beautiful golden color.
- High-Activity Yeast – This is the powerhouse. You can mix it directly with the other ingredients without needing to proof it in water first, making the process even simpler.
- White Sugar – We use just a small amount to actively promote yeast fermentation. It’s not for sweetness, so you can reduce it slightly if desired, but don’t omit it entirely.
- Salt – Essential for balancing and enhancing all the other flavors in the bread. It also helps control yeast activity.
- Bread Flour (High-Gluten Flour) – This is non-negotiable for the right structure. Its high protein content is what gives this no-knead bread its chewy, airy texture without extensive gluten development. Do not substitute with all-purpose flour.
- Black Sesame Seeds – They add a wonderful nutty aroma and little pops of texture. White sesame seeds make a fine substitute.
- Raisins & Dried Cranberries – The classic sweet-tart combo. I recommend rinsing them quickly and patting them dry to remove any dust or sticking, and to prevent them from stealing too much moisture from the dough.
How to Make Low-Sugar, Oil-Free No-Knead Artisan Bread
1. Mix the Dough and Rest
In a large bowl, add the milk, egg, yeast, sugar, and salt. Add the bread flour and black sesame seeds, then add the mixed dried fruit.
Use a silicone spatula to fold everything together until there is no visible dry flour. The dough will be very wet — this is intentional, and no kneading is required.
Cover the bowl with plastic wrap and place it in the refrigerator for 20 minutes. This rest allows the flour to fully absorb the liquid and prevents premature fermentation in warm environments.
2. Fold the Dough and First Proof
After the rest, with wet hands or wearing disposable gloves, reach under one side of the dough, stretch it up, and fold it over toward the center.
Give the bowl a quarter turn and repeat this fold 4-5 times until the dough feels a bit tighter and more cohesive. This entire process takes about 30 seconds. Shape it into a rough ball in the bowl.
Cover again and let it proof in a warm, draft-free spot until doubled in size. This can take 1 to 1.5 hours depending on your kitchen’s temperature.
3. Shape and Second Proof
Generously flour your work surface. Turn out the dough and gently press to release excess air.
Shape it into a rectangle, then fold both sides toward the centre.
Fold both ends inward, tightening all seams to prevent cracking during baking.


Flip the dough seam-side down so the smooth side faces up. Transfer to a parchment-lined air fryer basket or baking tray. Let it proof again until doubled in size, about 30 minutes at warm room temperature.
 4. Bake
No preheating is required. Lightly dust the surface with flour and score three cuts across the top to allow steam to escape and improve the final shape.
Bake at 150°C (300°F) for 15 minutes. Remove the bread, flip it over, and return it to the oven or air fryer for another 15 minutes, until both sides are golden and crisp.
5. Cool and Slice
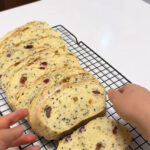
Transfer the baked loaf to a cooling rack and let it cool until just warm before slicing. Cutting while hot can cause the crumb to become gummy and crumbly.
Tips & Tricks
- This is a high-hydration dough, so mixing and folding are all you need — kneading will only make it messy.
- The refrigerator rest is essential. It improves dough handling and texture later on.
- Always proof until the dough doubles in size, not based on time alone.
- Flipping the bread halfway through baking ensures even browning and a crisp crust on both sides.
- If your oven runs hot, reduce the temperature slightly to prevent over-browning.
Frequently Asked Questions
Why is my bread dense?
Dense bread is usually caused by under-proofing. Make sure both rises reach a full doubling in size before moving to the next step.
My dough is a wet, sticky mess. Did I fail?
No! You succeeded. This is a high-hydration dough, and its stickiness is what leads to those beautiful, irregular holes inside the baked loaf. Trust the process and use the recommended handling techniques (wet hands, scraper).
Can I bake this without a Dutch oven or air fryer?
Yes, on a regular baking sheet. For the best crust, place a pan of boiling water on the bottom rack of your oven to create steam during the first half of baking. Bake the loaf on a parchment-lined sheet on the middle rack.
Beginner-Friendly No-Knead Artisan Bread Recipe
Ingredients
No-Knead Artisan Bread Dough
- 180 g pure milk
- 1 large egg approx. 50 g
- 3 g high-activity yeast
- 10 g white sugar
- 2 g salt
- 250 g bread flour high-gluten flour
- 15 g black sesame seeds
- 15 g raisins
- 30 g dried cranberries
For Dusting & Slashing
- 1 tablespoon bread flour for dusting
Instructions
Mix the Dough and Rest
- In a large bowl, add the milk, egg, yeast, sugar, and salt. Add the bread flour and black sesame seeds, then add the mixed dried fruit.
- Use a silicone spatula to fold everything together until there is no visible dry flour. The dough will be very wet — this is intentional, and no kneading is required.
- Cover the bowl with plastic wrap and place it in the refrigerator for 20 minutes. This rest allows the flour to fully absorb the liquid and prevents premature fermentation in warm environments.
Fold the Dough and First Proof
- After the rest, with wet hands or wearing disposable gloves, reach under one side of the dough, stretch it up, and fold it over toward the center. Give the bowl a quarter turn and repeat this fold 4-5 times until the dough feels a bit tighter and more cohesive. This entire process takes about 30 seconds. Shape it into a rough ball in the bowl.
- Cover again and let it proof in a warm, draft-free spot until doubled in size. This can take 1 to 1.5 hours depending on your kitchen's temperature.
Shape and Second Proof
- Generously flour your work surface. Turn out the dough and gently press to release excess air.
- Shape it into a rectangle, then fold both sides toward the centre.
- Fold both ends inward, tightening all seams to prevent cracking during baking.
- Flip the dough seam-side down so the smooth side faces up. Transfer to a parchment-lined air fryer basket or baking tray. Let it proof again until doubled in size, about 30 minutes at warm room temperature.
Bake
- No preheating is required. Lightly dust the surface with flour and score three cuts across the top to allow steam to escape and improve the final shape.
- Bake at 150°C (300°F) for 15 minutes. Remove the bread, flip it over, and return it to the oven or air fryer for another 15 minutes, until both sides are golden and crisp.
Cool and Slice
- Transfer the baked loaf to a cooling rack and let it cool until just warm before slicing. Cutting while hot can cause the crumb to become gummy and crumbly.
Nutrition


Leave a Reply