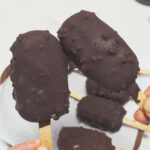
These chocolate-covered yogurt popsicles are the perfect treat to satisfy any sweet tooth! With the tangy flavor of yogurt, a crunchy peanut layer, and rich chocolate coating, they’re as easy to make as they are delicious.
Say Goodbye to Store-Bought: Easy Homemade Chocolate Popsicles
My kids absolutely love popsicles, and when they heard I was planning to make homemade chocolate popsicles, they were practically jumping with excitement!
On hot days, popsicles are always their go-to request, but lately, I’ve felt a bit uneasy about buying them from the store.
I recently came across some concerning news: several brands, even popular ones, tested positive for E. coli bacteria.
It was shocking to learn that something as simple as a popsicle could be contaminated – just imagine!
While I don’t want to criticize all store-bought options, it made me think twice.
With homemade popsicles, I know exactly what goes into them. They’re safer, more economical, and so much fresher.
I’ve already made Red Bean and Mung Bean Popsicles and Mango Popsicles, but this time, I wanted to try something a bit different.
My kids are huge chocolate lovers, so a chocolate popsicle was an obvious choice! The rich chocolate coating combined with creamy yogurt is a match made in heaven, especially when you add a bit of crunch. They’re so easy to make that I now whip up a big batch each time and store them in the freezer.
Now, whenever my kids want a cool treat, they just grab one straight from the freezer, and I feel good knowing they’re enjoying a delicious, homemade snack.

How to Easily Remove Popsicles from Molds
I use a silicone mold, which is soft and flexible, making it easy to pop the popsicles out. If you’re using a hard mold, try this tip: dip the entire popsicle mold into warm water for about 10 seconds, then quickly lift it out.
Be sure to fully submerge the mold so the popsicles loosen evenly, making it easier to pull them out without breaking.
Ingredients
Popsicle Mixture
- 150g yogurt
- 250ml heavy cream, chilled
- 80g sweetened condensed milk(can be substituted with an equal amount of white granulated sugar)
- 200ml whole milk
- a handful of raisins (optional)
Chocolate Coating
- 180g chocolate
- 60g coconut oil
- 50g crushed peanuts
Tools
- Whisk
- Popsicle molds
- Double boiler or heatproof bowl for melting chocolate
- Freezer-safe sealed bags for storage
Instructions
1. Prepare the Popsicle Mixture
Whip the Cream: Pour 250ml heavy cream (make sure it’s well-chilled) into a clean mixing bowl. Add 80g sweetened condensed milk to the cream. Using a whisk or an electric mixer, whip the cream and condensed milk together until it reaches a semi-whipped consistency, where it forms soft peaks but is still slightly fluid.
Combine with Milk and Yogurt: In another bowl, mix 200ml whole milk with 150g yogurt until smooth. Gently fold this yogurt-milk mixture into the whipped cream mixture, stirring until everything is well combined. This will be your popsicle base.
2. Fill the Molds and Freeze
Prepare the Molds: Rinse and dry your popsicle molds thoroughly. Carefully pour the popsicle mixture into each mold, leaving a small gap at the top to allow for expansion as they freeze.
- Note: If you like, add a few raisins into each mold before freezing for an extra burst of flavor.
Freeze the Popsicles: Cover the molds with their lids and place them in the freezer for 4-6 hours, or until the popsicles are completely frozen and solid.
3. Make the Chocolate Coating
Melt the Chocolate: Place 180g chocolate and 60g coconut oil in a heatproof bowl. Melt the chocolate using a double boiler, stirring until it’s completely smooth and liquid.
- Note: Maintain a gentle heat while melting the chocolate to avoid burning it. Stir continuously for a smooth consistency.
Add Peanuts (Optional): If you’d like extra crunch, stir 50g crushed peanuts into the melted chocolate. Mix well to distribute the peanuts evenly throughout the chocolate.
4. Coat the Popsicles
Unmold the Popsicles: Remove the popsicles from the freezer and carefully take them out of the molds.
Dip in Chocolate: Working quickly, dip each popsicle into the melted chocolate, making sure it’s coated evenly. The chocolate will harden almost instantly on the frozen popsicle.
Extra Freeze (Optional): For a firmer coating, place the chocolate-dipped popsicles on a plate and return them to the freezer for 10 minutes to let the chocolate set fully.

5. Store and Enjoy
Store for Later: Once the popsicles are completely set, you can individually wrap each one in a sealed freezer bag, then place it back in the freezer for storage.
Enjoy: When you’re ready, grab a popsicle straight from the freezer and indulge in the creamy, chocolatey delight with a nutty crunch!
Notes
- Chill the Cream: For best results, use cold heavy cream; this helps it whip up to a smooth, semi-firm texture.
- Chocolate Melting Tip: Keep the water in your double boiler at a gentle simmer to prevent the chocolate from burning.
- Work Quickly with Chocolate: Dip the popsicles quickly to prevent them from melting, as frozen popsicles warm up fast when exposed to melted chocolate.
Homemade Chocolate Popsicles
Ingredients
Popsicle Mixture
- 150 g yogurt
- 250 ml heavy cream chilled
- 80 g sweetened condensed milk can be substituted with an equal amount of white granulated sugar
- 200 ml whole milk
- a handful of raisins optional
Chocolate Coating
- 180 g chocolate
- 60 g coconut oil
- 50 g crushed peanuts
Instructions
Prepare the Popsicle Mixture
- Whip the Cream: Pour 250ml heavy cream (make sure it's well-chilled) into a clean mixing bowl. Add 80g sweetened condensed milk to the cream. Using a whisk or an electric mixer, whip the cream and condensed milk together until it reaches a semi-whipped consistency, where it forms soft peaks but is still slightly fluid.
- Combine with Milk and Yogurt: In another bowl, mix 200ml whole milk with 150g yogurt until smooth. Gently fold this yogurt-milk mixture into the whipped cream mixture, stirring until everything is well combined. This will be your popsicle base.
Fill the Molds and Freeze
- Prepare the Molds: Rinse and dry your popsicle molds thoroughly. Carefully pour the popsicle mixture into each mold, leaving a small gap at the top to allow for expansion as they freeze.
- Note: If you like, add a few raisins into each mold before freezing for an extra burst of flavor.
- Freeze the Popsicles: Cover the molds with their lids and place them in the freezer for 4-6 hours, or until the popsicles are completely frozen and solid.
Make the Chocolate Coating
- Melt the Chocolate: Place 180g chocolate and 60g coconut oil in a heatproof bowl. Melt the chocolate using a double boiler, stirring until it's completely smooth and liquid.
- Note: Maintain a gentle heat while melting the chocolate to avoid burning it. Stir continuously for a smooth consistency.
- Add Peanuts (Optional): If you'd like extra crunch, stir 50g crushed peanuts into the melted chocolate. Mix well to distribute the peanuts evenly throughout the chocolate.
Coat the Popsicles
- Unmold the Popsicles: Remove the popsicles from the freezer and carefully take them out of the molds.
- Dip in Chocolate: Working quickly, dip each popsicle into the melted chocolate, making sure it's coated evenly. The chocolate will harden almost instantly on the frozen popsicle.
- Extra Freeze (Optional): For a firmer coating, place the chocolate-dipped popsicles on a plate and return them to the freezer for 10 minutes to let the chocolate set fully.
Store and Enjoy
- Store for Later: Once the popsicles are completely set, you can individually wrap each one in a sealed freezer bag, then place it back in the freezer for storage.
- Enjoy: When you're ready, grab a popsicle straight from the freezer and indulge in the creamy, chocolatey delight with a nutty crunch!


Leave a Reply