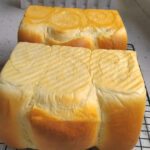
An easy yet incredibly delicious Hokkaido milk bread with a rich, creamy aroma and a texture that’s as soft and fluffy as a cloud. Every bite is tender and moist, with no dryness at all. I love tearing it apart slice by slice instead of cutting it—the soft layers pull away beautifully, and somehow it tastes even better that way.")
I almost always make a double batch because one loaf disappears far too quickly.
It’s perfect for breakfast, afternoon snacks, or simply enjoyed on its own.
If you don’t think you’ll finish it all, you can easily halve the recipe and still get a wonderfully soft loaf.
While the bread is baking, the whole house fills with the comforting smell of fresh milk bread.
That’s usually when my youngest daughter comes into the kitchen, asking again and again, “Is it ready yet? Can we eat it now?”
It’s one of those simple moments that makes homemade bread feel extra special.")
")
Why You’ll Love This Recipe
- This Hokkaido milk bread is exceptionally soft and fluffy, with a delicate, shreddable crumb.
- The combination of milk, cream, butter, and milk powder creates a deeply rich yet clean dairy flavor.
- It’s beginner-friendly and works with either a stand mixer or hand kneading.
- Perfect for toast, sandwiches, or tearing apart by hand.
- The bread stays soft for days and freezes beautifully.
Ingredients and Substitutions
- Bread flour – High-gluten flour is essential for structure and stretch. I recommend using flour with 11–13% protein. Do not substitute with all-purpose or low-protein flour, as it will affect volume and texture.
- Milk powder – This boosts the milk aroma and richness. Full-fat milk powder gives the best flavor, but skim milk powder works if needed, just with a lighter dairy note.
- Eggs – Eggs add softness, richness, and structure. Room-temperature eggs are ideal to avoid slowing fermentation.
- Whipping cream – I recommend animal-based cream for the finest crumb and smooth milk flavor. Plant-based cream can be used, but the texture will be slightly heavier.
- Milk – Whole milk adds moisture and enhances the overall flavor. Adjust slightly depending on flour absorption.
- Butter – Butter must be fully softened before use. It improves elasticity, aroma, and crumb tenderness and should not be skipped.
- Salt – Essential for balancing sweetness and enhancing flavor.
- Granulated sugar – Adds gentle sweetness and supports yeast fermentation. You can reduce slightly if you prefer a less sweet loaf.
- Yeast – The key to proper rise. Make sure it’s fresh and active; dissolving it in warm water helps ensure even fermentation.
")
How to Make Hokkaido Milk Bread
Mix Ingredients & Initial Kneading
Add bread flour, milk powder, eggs, whipping cream, milk, sugar, salt, and yeast into the mixing bowl.
Knead on low speed for about 1 minute until everything comes together into a rough dough.
If kneading by hand, mix until no dry flour remains, then knead using a rubbing and folding motion for 15–20 minutes.
Add Butter & Knead Until Windowpane
Add the softened butter and continue kneading. With a stand mixer, knead on higher speed for about 10 minutes until the dough becomes smooth, elastic, and can stretch into a thin membrane without tearing (windowpane stage).
For hand kneading, continue folding and kneading for an additional 10–15 minutes until the dough reaches the same elastic stage.
First Fermentation
Cover the dough tightly and let it ferment in a warm environment (28–30°C / 82–86°F) until doubled in size, about 60–90 minutes. Press a finger lightly into the dough—if the indentation does not collapse or spring back, it’s ready.
Degas, Divide & Rest
Gently press the dough to release excess gas.
Divide evenly into 6 portions (about 170 g each) and shape into balls. Cover and let rest for 20 minutes to relax the gluten, which makes shaping easier.

Shape & Second Fermentation
Roll each rested dough portion into a long oval. Gently roll toward both sides to release the air, fold the sides inward, then roll tightly from one end to form a log. Place 3 pieces into each loaf pan.


Cover and proof in a warm, humid environment (35–38°C / 95–100°F, about 70% humidity) until the dough reaches about 90% of the pan height.
Bake
Preheat the oven to 160°C (320°F) top heat and 220°C (430°F) bottom heat. If your oven doesn’t allow separate control, set it to 190°C (375°F).
Bake on the middle rack for 28 minutes, until golden brown and springy to the touch. Remove immediately, invert onto a cooling rack, and let cool completely before slicing.
Storage
Store the bread at room temperature in a sealed bag for up to 2 days.
For longer storage, slice and freeze in an airtight container for up to 1 month. Thaw at room temperature or toast directly from frozen.
Tips & Tricks
- Butter must be fully softened or it won’t incorporate smoothly into the dough.
- If the dough feels dry during kneading, add milk gradually (about 5 g at a time). If too wet, dust lightly with bread flour.
- Proper gluten development is key—the better the windowpane, the softer and more elastic the final bread.
- Keep fermentation temperatures controlled. Too hot can cause sourness; too cool will slow the rise.
- Always invert the bread immediately after baking to prevent collapse and shrinkage.
- Let the loaf cool completely before slicing to avoid tearing the crumb.
Frequently Asked Questions
Why isn’t my bread as soft as expected?
This is usually due to insufficient gluten development or under-fermentation. Make sure the dough reaches the windowpane stage and doubles fully during the first rise.
Can I reduce the sugar?
Yes. You can reduce it slightly for a less sweet loaf, but avoid cutting too much, as sugar supports yeast activity and softness.
Why did my bread collapse after baking?
Over-proofing during the second fermentation or not inverting the loaf immediately after baking can cause collapse.
The Softest Hokkaido Milk Bread – Bakery-Style at Home
Ingredients
- 500 g bread flour
- 20 g milk powder
- 2 eggs about 100 g, room temperature
- 150 g whipping cream
- 170 g milk
- 80 g granulated sugar
- 6 g salt
- 5 g yeast
- 12 g butter softened
Instructions
Mix Ingredients & Initial Kneading
- Add bread flour, milk powder, eggs, whipping cream, milk, sugar, salt, and yeast into the mixing bowl. Knead on low speed for about 1 minute until everything comes together into a rough dough.
- If kneading by hand, mix until no dry flour remains, then knead using a rubbing and folding motion for 15–20 minutes.
Add Butter & Knead Until Windowpane
- Add the softened butter and continue kneading. With a stand mixer, knead on higher speed for about 10 minutes until the dough becomes smooth, elastic, and can stretch into a thin membrane without tearing (windowpane stage).
- For hand kneading, continue folding and kneading for an additional 10–15 minutes until the dough reaches the same elastic stage.
First Fermentation
- Cover the dough tightly and let it ferment in a warm environment (28–30°C / 82–86°F) until doubled in size, about 60–90 minutes. Press a finger lightly into the dough—if the indentation does not collapse or spring back, it's ready.
Degas, Divide & Rest
- Gently press the dough to release excess gas.
- Divide evenly into 6 portions (about 170 g each) and shape into balls. Cover and let rest for 20 minutes to relax the gluten, which makes shaping easier.
Shape & Second Fermentation
- Roll each rested dough portion into a long oval. Gently roll toward both sides to release the air, fold the sides inward, then roll tightly from one end to form a log. Place 3 pieces into each loaf pan.
- Cover and proof in a warm, humid environment (35–38°C / 95–100°F, about 70% humidity) until the dough reaches about 90% of the pan height.
Bake
- Preheat the oven to 160°C (320°F) top heat and 220°C (430°F) bottom heat. If your oven doesn't allow separate control, set it to 190°C (375°F).
- Bake on the middle rack for 28 minutes, until golden brown and springy to the touch. Remove immediately, invert onto a cooling rack, and let cool completely before slicing.


Leave a Reply