This easy muah chee recipe uses simple ingredients and a time-saving boiling method instead of steaming. The result is bouncy, chewy Chinese mochi that stays soft even the next day. No oven required and beginner-friendly.")
This muah chee brings back such vivid childhood memories for me.
When I was little, every time we went shopping, there were always small street stalls selling freshly made muah chee. I would tug at my mom’s hand and beg her to buy me one.
Muah chee is actually quite similar to Japanese mochi, like the familiar taro mochi, but I prefer to call this version Chinese-style muah chee.
What sets it apart is how much simpler it is to make. It uses fewer ingredients, the steps are straightforward, and even beginners can make it successfully.
This recipe was passed down from my mom.
Instead of the traditional steaming method, I use a more time-saving approach by cooking the raw muah chee dough directly in boiling water. It’s quick and still delivers the perfect texture.
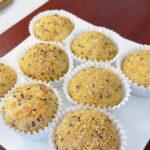
The finished muah chee skin is springy and pleasantly chewy, and it stays soft even the next day.")
")
Why You‘ll Love This Recipe
- This muah chee is soft, chewy, and stretchy.
- The peanut and sesame filling is fragrant, nutty, and slightly chunky, making every bite more interesting
- The method is simple and beginner-friendly, no steaming or special equipment required.
- It stays soft even the next day when stored properly.
- No oven needed, just a pot of boiling water and a few easy steps.
Ingredients and Substitutions
- Glutinous rice flour – This flour gives the muah chee its signature soft, elastic, and stretchy texture. It cannot be replaced with ordinary rice flour.
- Sugar – Adds a light sweetness to the muah chee skin. You can adjust slightly if you prefer it less sweet, but it helps balance the nutty filling.
- Water – Used to bring the dough together. The amount may need slight adjustment depending on how absorbent your flour is.
- Corn oil / butter – This keeps the muah chee moist, prevents sticking, and helps it stay soft even the next day. Butter adds extra aroma, while corn oil keeps the flavour clean.
- Roasted peanuts – Unsalted and unsweetened peanuts give the filling its main flavour. Removing the skins makes the filling more aromatic and smooth.
- Roasted black sesame seeds – Adds deep, nutty aroma and richness to the filling.
- Roasted white sesame seeds – Balances the black sesame and adds another layer of fragrance.
- Sugar (for filling) – Adjust based on your sweetness preference. The filling should be sweet but not overpowering.
How to Make Muah Chee
1. Make the Peanut & Sesame Filling
Add the roasted peanuts, black sesame seeds, white sesame seeds, and sugar into a food processor.
Pulse until the mixture becomes coarsely ground with visible texture. Do not grind it into a fine powder—keeping some chunks makes the filling more aromatic and satisfying.
Transfer the filling to a bowl and mix well. If the mixture feels dry, add a small amount of neutral oil and mix until it comes together easily. Set aside.
2. Prepare the Muah Chee Dough
In a large bowl, combine the glutinous rice flour and sugar. Mix well with chopsticks.
Gradually add the water while stirring until the mixture forms a shaggy dough with no dry flour left. Knead by hand until the dough becomes smooth and no longer sticky. If the dough feels too dry, add a little water; if too wet, add a small amount of glutinous rice flour.
Cover the dough and let it rest for 5 minutes.
3. Boil the Dough
Bring a pot of water to a rolling boil. Pinch the rested dough into small pieces, about 25 g each.
Drop the dough pieces directly into the boiling water, gently stirring to prevent them from sticking to the bottom.
Cook until the pieces float to the surface, then continue boiling for another 2 minutes to ensure they are fully cooked through.
Remove with a slotted spoon and drain well.
4. Stretch the Muah Chee
Transfer the hot, cooked muah chee into a large bowl.
Add the corn oil or butter while it’s still hot.
Use a rolling pin to press and mash the muah chee until the oil is fully absorbed.
When the muah chee cools down to warm (about 40°C, no longer too hot to touch), put on disposable gloves.
Repeatedly stretch, fold, and pull the muah chee until it becomes smooth, elastic, and stretchy. The more you stretch it, the better the texture.")
")
")
5. Fill and Shape
Divide the stretched muah chee into portions of about 45 g each.
Press each portion into a round disc, keeping the center slightly thicker than the edges to prevent tearing.
Place about 20 g of filling in the center.
Gently pinch the edges together to seal and roll into a smooth ball.
Finally, roll the finished muah chee in the remaining filling until evenly coated.
Tips & Tricks
- Gloves Are Non-Negotiable: The cooked mochi dough is intensely sticky. Disposable food-grade gloves are the only reliable way to handle and stretch it without a frustrating mess.
- Knead While Warm, But Not Hot: The mochi must be warm enough to be pliable for the stretching process, but if it’s too hot, it will be difficult to handle. Let it cool just enough that you can tolerate the heat through the gloves.
- The Stretch is Everything: Don’t rush or skip the stretching and folding step. This is what develops the signature chewy, bouncy, stretchy texture. The more you stretch, the better the texture.
- Use Pre-Roasted Ingredients: For the filling, ensure your peanuts and sesame seeds are already roasted. This brings out their oils and maximum flavor. If you must use raw ingredients, toast them in a dry pan over low heat until fragrant and lightly colored before grinding.
- Keep the Filling Coarse: A filling with varied texture (fine crumbs mixed with small chunks) provides a much more interesting mouthfeel than a uniform powder. It also adheres better to the mochi.
Frequently Asked Questions
Why did my mochi turn out hard and not chewy?
This usually happens for two reasons: 1) Not enough kneading/stretching after cooking. The gluten network in the mochi needs to be developed through physical manipulation. 2) The dough was undercooked. Make sure the pieces boil for a full 2 minutes after they float. 3) Skipping the fat. The oil or butter is essential for moisture and pliability.
Can muah chee be made ahead of time?
Yes. Store it in an airtight container in the fridge. Before eating, microwave for about 10 seconds to restore softness.
My mochi is too sticky to handle, even with gloves. What do I do?
If it’s still unmanageably sticky, your dough may have been slightly too wet. Dust your gloves very lightly with extra glutinous rice flour or coat your hands in a tiny bit more oil. The dough should be tacky but not glue-like once worked.
Easy Muah Chee (Chinese Mochi) with Peanut Sesame Filling
Ingredients
For the Mochi Dough
- 150 g glutinous rice flour
- 20 g granulated sugar
- 120 g water
- 15 g corn oil or melted butter
For the Sesame-Peanut Coating
- 150 g roasted unsalted peanuts
- 15 g roasted black sesame seeds
- 15 g roasted white sesame seeds
- 30-50 g granulated sugar to taste
Instructions
Make the Peanut & Sesame Filling
- Add the roasted peanuts, black sesame seeds, white sesame seeds, and sugar into a food processor.
- Pulse until the mixture becomes coarsely ground with visible texture. Do not grind it into a fine powder—keeping some chunks makes the filling more aromatic and satisfying.
- Transfer the filling to a bowl and mix well. If the mixture feels dry, add a small amount of neutral oil and mix until it comes together easily. Set aside.
Prepare the Muah Chee Dough
- In a large bowl, combine the glutinous rice flour and sugar. Mix well with chopsticks.
- Gradually add the water while stirring until the mixture forms a shaggy dough with no dry flour left. Knead by hand until the dough becomes smooth and no longer sticky. If the dough feels too dry, add a little water; if too wet, add a small amount of glutinous rice flour.
- Cover the dough and let it rest for 5 minutes.
Boil the Dough
- Bring a pot of water to a rolling boil. Pinch the rested dough into small pieces, about 25 g each.
- Drop the dough pieces directly into the boiling water, gently stirring to prevent them from sticking to the bottom.
- Cook until the pieces float to the surface, then continue boiling for another 2 minutes to ensure they are fully cooked through.
- Remove with a slotted spoon and drain well.
Stretch the Muah Chee
- Transfer the hot, cooked muah chee into a large bowl.
- Add the corn oil or butter while it's still hot.
- Use a rolling pin to press and mash the muah chee until the oil is fully absorbed.
- When the muah chee cools down to warm (about 40°C, no longer too hot to touch), put on disposable gloves.
- Repeatedly stretch, fold, and pull the muah chee until it becomes smooth, elastic, and stretchy. The more you stretch it, the better the texture.
Fill and Shape
- Divide the stretched muah chee into portions of about 45 g each.
- Press each portion into a round disc, keeping the center slightly thicker than the edges to prevent tearing.
- Place about 20 g of filling in the center.
- Gently pinch the edges together to seal and roll into a smooth ball.
- Finally, roll the finished muah chee in the remaining filling until evenly coated.


Leave a Reply