This pan-fried bread is one of those recipes I reach for again and again when I want a soft, comforting breakfast without turning on the oven.
Instead of using water, I rely entirely on eggs and milk to bring moisture, flavour, and nutrition to the dough.")
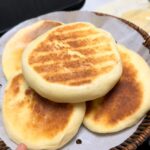
The result is a bread that’s pan-fried yet soft and fluffy like steamed buns.
If you’ve ever made my Fluffy Steamed Buns (like the Bunny Buns or Lotus Leaf Buns) before, you’ll immediately understand what I mean after the first bite.
It’s simple, reliable, and perfect for everyday mornings.")
")
Ingredients and Substitutions
- Eggs – Along with the milk, they completely replace water in the dough. This adds incredible richness, nutrition, and is the key to that soft, cake-like crumb.
- Whole Milk – I recommend using whole milk for the best flavour and texture, as the fat contributes to tenderness. It works with the eggs to create the perfect dough hydration. In a pinch, lower-fat milk can be used.
- High-Activity Yeast – This is our leavening agent, responsible for the light and airy puff. You can mix it directly into the liquid ingredients without needing to proof it separately first.
- All-Purpose Flour – The ideal flour for this recipe. It gives the bread the perfect balance of structure and soft chew. Don’t substitute with bread flour (too chewy) or cake flour (too delicate).
- Corn Oil – We use just a small amount to keep the dough moist and prevent it from drying out or becoming tough, especially after it cools. A neutral oil like this works perfectly.
- Condensed Milk (Optional) – I sometimes add a touch for a hint of caramelized milk sweetness. You can easily substitute it with a bit of sugar or honey, or simply omit it for a completely plain bread.
How to Make Pan-Fried Milk & Egg Bread
Make the Dough
In a large mixing bowl, combine the eggs, milk, and condensed milk (or sugar, if using). Whisk until smooth.
Sprinkle the yeast over the liquid and whisk again to disperse. Add all of the all-purpose flour. Stir with a spatula or wooden spoon until a shaggy, floury dough forms. Pour in the corn oil.

Knead the Dough
At this stage, the dough will be very sticky and shaggy. This is normal due to the high hydration. I highly recommend using disposable food-safe gloves to handle it. Knead the dough right in the bowl or on a clean counter until it comes together into a cohesive, but still tacky, mass.
Continue kneading for about 5-7 minutes until it becomes much smoother and less sticky. If it’s unmanageable, you can dust the surface with a tiny pinch of flour, but try to avoid adding too much. There is no need for a first bulk rise.

Shape and Proof
Once the dough is smooth, roll it into a long log and divide it into equal portions, about 50 g each.
Roll each portion into a smooth ball.

Take one dough ball and roll it into a round disc slightly thicker than a coin, about 0.6 cm thick. Make sure the thickness is even. Too thin and the bread will become overly crisp; too thick and it may not cook through properly.
Place the shaped discs on a lightly floured surface, cover with a damp cloth or plastic wrap, and let them proof until doubled in size, about 30 minutes.
Once proofed, the dough should feel light and spring back quickly when gently pressed.
Pan-Fry the Bread
Heat a pan or electric griddle over medium-low heat. No oil is needed.
Place the proofed dough into the pan, leaving space between each piece. Cover with a lid and cook for 3–4 minutes until the bottom sets and the bread begins to puff up.
Flip the bread, cover again, and cook for another 3 minutes. Continue flipping 2–3 more times, covering the pan each time, until both sides are evenly golden.
The bread is done when it springs back quickly when pressed and feels light. Remove from the pan and serve warm.
Tips & Tricks
- This dough has a high moisture content, so wearing gloves while kneading helps prevent sticking. Avoid adding extra flour unless absolutely necessary.
- Proper proofing is key. The dough should double in size, no more and no less. Under-proofed dough will be dense, while over-proofed dough may collapse or taste sour.
- Always cook over medium-low heat. High heat can brown the outside too quickly while leaving the inside undercooked.
- Covering the pan is essential. The trapped steam helps the bread cook through and stay soft.
- Flipping the bread multiple times ensures even colouring and a lightly crisp surface without drying it out.
Frequently Asked Questions
Why is my pan-fried bread dense or hard?
This usually means the dough wasn’t proofed enough or too much flour was added during kneading. Make sure the dough doubles in size before cooking and avoid adding excess dry flour.
Can I make this bread ahead of time?
Yes. Once cooled, the bread can be stored and reheated gently in a pan. Thanks to the eggs and milk, it stays soft even after cooling.
Why do I need to keep the lid on while cooking?
Covering the pan traps steam, which allows the inside of the bread to cook through and stay fluffy instead of drying out.
Can I make this bread savoury?
Absolutely. Simply omit the condensed milk or sweetener. The base dough works beautifully for savoury fillings or sandwiches.
Soft & Fluffy Pan-Fried Bread Like Steamed Buns
Ingredients
- 2 large eggs approx. 100 g
- 220 g whole milk
- 5 g high-activity instant yeast
- 500 g all-purpose flour
- 20 g corn oil
- 10 g condensed milk or 5 g granulated sugar/honey, optional
- Extra flour for dusting
Instructions
Make the Dough
- In a large mixing bowl, combine the eggs, milk, and condensed milk (or sugar, if using). Whisk until smooth.
- Sprinkle the yeast over the liquid and whisk again to disperse. Add all of the all-purpose flour. Stir with a spatula or wooden spoon until a shaggy, floury dough forms. Pour in the corn oil.
Knead the Dough
- At this stage, the dough will be very sticky and shaggy. This is normal due to the high hydration. I highly recommend using disposable food-safe gloves to handle it. Knead the dough right in the bowl or on a clean counter until it comes together into a cohesive, but still tacky, mass.
- Continue kneading for about 5-7 minutes until it becomes much smoother and less sticky. If it's unmanageable, you can dust the surface with a tiny pinch of flour, but try to avoid adding too much. There is no need for a first bulk rise.
Shape and Proof
- Once the dough is smooth, roll it into a long log and divide it into equal portions, about 50 g each.
- Roll each portion into a smooth ball.
- Take one dough ball and roll it into a round disc slightly thicker than a coin, about 0.6 cm thick. Make sure the thickness is even. Too thin and the bread will become overly crisp; too thick and it may not cook through properly.
- Place the shaped discs on a lightly floured surface, cover with a damp cloth or plastic wrap, and let them proof until doubled in size, about 30 minutes.
- Once proofed, the dough should feel light and spring back quickly when gently pressed.
Pan-Fry the Bread
- Heat a pan or electric griddle over medium-low heat. No oil is needed.
- Place the proofed dough into the pan, leaving space between each piece. Cover with a lid and cook for 3–4 minutes until the bottom sets and the bread begins to puff up.
- Flip the bread, cover again, and cook for another 3 minutes. Continue flipping 2–3 more times, covering the pan each time, until both sides are evenly golden.
- The bread is done when it springs back quickly when pressed and feels light. Remove from the pan and serve warm.


Leave a Reply