If you have a rice cooker, you have to try this bread. No oven, no pan, and no kneading required. This lazy rice cooker bread turns out fluffy, soft, and aromatic every time, even if you’ve never baked bread before.")
In my house, the rice cooker is so much more than just a rice cooker. It’s one of the most-used appliances in my kitchen, and I love how versatile it is.
I often use it to make easy one-pot meals like sausage rice or rice cooker salmon rice, and it even works surprisingly well for baking.
One of my favourites is a fluffy rice cooker cake — soft, tender, and completely oven-free.
That’s exactly why I always say — if you have a rice cooker at home, you really should let it do more than just cook rice.
This rice cooker bread is one of the best places to start.
It’s simple, reliable, and incredibly satisfying, and it truly shows how versatile a humble rice cooker can be.")
")
Why You‘ll Love This Recipe
- No oven or pan required — everything is done in a rice cooker.
- Beginner-friendly and nearly foolproof, even if you’ve never worked with yeast before.
- Soft, fluffy, and tender texture thanks to a high-hydration dough and proper fermentation.
- Minimal effort — no kneading, no shaping skills needed.
- Versatile — great for breakfast, as a staple bread, or served with savoury dishes.
- Stays soft even when cooled, making it perfect for make-ahead meals.
Ingredients and Substitutions
- All-purpose flour – Regular household flour works perfectly here; there’s no need for bread flour or cake flour. This flour gives the bread structure while still keeping it soft and fluffy.
- Sugar – A small amount of sugar is used to help activate the yeast. It doesn’t make the bread sweet and won’t affect the final flavour.
- Dry yeast – I recommend using high-activity dry yeast if possible. It helps the dough rise faster and more reliably, especially for beginners.
- Water – Room temperature water works well. In colder months, I like using warm water (about 30–35°C) to help the yeast activate properly. In warmer weather, room temperature water is completely fine.
How to Make Rice Cooker Bread
Make the Dough
Add the flour, sugar, and dry yeast directly into the rice cooker inner pot.
Gradually pour in the water while stirring continuously with chopsticks.
Mix until all the flour is fully hydrated and no dry spots remain. The dough should be soft, smooth, and slightly elastic.
There’s no need to knead — thorough mixing is enough. A soft dough is essential for achieving a fluffy, tender bread.
First Rise (Sealed Fermentation)
Leave the dough inside the rice cooker inner pot. Close the lid tightly to create a sealed environment.
If your rice cooker doesn’t seal well, you can place a clean kitchen towel around the edge before closing the lid.
Let the dough rise at room temperature until it doubles in size.
This usually takes about 1½–2 hours at around 25°C. In colder weather, using warm water when mixing the dough can shorten the rising time to about 1 hour.
The dough is ready when the interior looks honeycomb-like and a gentle poke with chopsticks doesn’t spring back.
Degas and Shape
Once risen, the dough will be full of air.
Use chopsticks to gently stir along the sides of the pot for 2–3 minutes to release the trapped air. Proper degassing helps create a finer, more even crumb without large holes.
Lightly press the dough with the back of your hand and shape it into a roughly even round. There’s no need to make it perfect — it will naturally even out as it cooks.

Second Rise
Cover the dough again and allow it to rise until about 1.5 times its original size, roughly 30–40 minutes. When ready, the dough will slowly spring back when pressed and won’t collapse.
Cook in the Rice Cooker
Press the “Cook / Rice” button and cook for 20 minutes.
Open the lid and gently flip the bread using a silicone spatula or chopsticks. The bottom should already be set and lightly golden.
Close the lid again and press “Cook / Rice” for another 10 minutes.
If needed, flip once more and cook for an additional 2–3 minutes until both sides are evenly golden and slightly puffed.
Serve
Remove the bread from the rice cooker and let it cool for about 2 minutes before slicing.
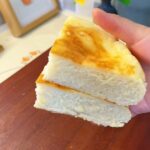
Cut into wedges or pieces and enjoy while warm. The bread is soft, fluffy, and aromatic — and it stays tender even after cooling.
Tips & Tricks
- Trust the Process: The initial dough will look wet, sticky, and unpromising. This high-hydration dough is what creates the wonderful, open crumb. Do not add extra flour.
- Lid Seal is Crucial: A tight seal during the rising phases traps moisture and warmth, creating the perfect proofing box. If your lid is loose, drape a clean kitchen towel over the pot before closing the lid.
- No Peeking During Cooking: Resist the urge to open the lid during the first 20-minute cook. You’ll let out the crucial steam that helps the bread cook evenly and rise fully.
- The Flip is Key: Flipping the bread ensures even browning on both sides since the rice cooker’s heat primarily comes from the bottom.
- Cool Before Slicing: Slicing into hot bread releases all the trapped steam and can make the crumb gummy. Let it rest for the best texture.
Frequently Asked Questions
My dough didn’t rise at all. What happened?
This almost always points to inactive yeast. Your yeast may be old, or the water was too hot and killed it. Next time, ensure your yeast is fresh and your water is just warm to the touch, not hot.
The bread is very dense and doughy inside.
This usually means the dough didn’t proof long enough during either the first or second rise. In a cool kitchen, it can take much longer. The dough must look visibly puffy and doubled before moving to the next step. Under-proofed dough bakes up dense.
Can I add herbs, cheese, or other flavors?
Absolutely! After the first rise when you’re degassing the dough, you can gently fold in up to 1/2 cup of additions like chopped herbs, grated cheese, sun-dried tomatoes, or everything bagel seasoning. Be gentle to avoid deflating the dough too much.
My rice cooker doesn’t have a non-stick pot. Will it stick?
It might. For a non-non-stick pot, it’s wise to very lightly grease the bottom with a neutral oil (like canola) before adding the ingredients in Step 1. Do not grease the sides.
Rice Cooker Bread (No Oven, Super Soft & Fluffy)
Ingredients
- 300 g all-purpose flour
- 3 g granulated sugar about 3/4 teaspoon
- 3 g active dry yeast about 1 teaspoon
- 240 g water room temperature or warm (see note above)
Instructions
Make the Dough
- Add the flour, sugar, and dry yeast directly into the rice cooker inner pot.
- Gradually pour in the water while stirring continuously with chopsticks.
- Mix until all the flour is fully hydrated and no dry spots remain. The dough should be soft, smooth, and slightly elastic.
- There's no need to knead — thorough mixing is enough. A soft dough is essential for achieving a fluffy, tender bread.
First Rise (Sealed Fermentation)
- Leave the dough inside the rice cooker inner pot. Close the lid tightly to create a sealed environment.
- If your rice cooker doesn't seal well, you can place a clean kitchen towel around the edge before closing the lid.
- Let the dough rise at room temperature until it doubles in size.
- This usually takes about 1½–2 hours at around 25°C. In colder weather, using warm water when mixing the dough can shorten the rising time to about 1 hour.
- The dough is ready when the interior looks honeycomb-like and a gentle poke with chopsticks doesn't spring back.
Degas and Shape
- Once risen, the dough will be full of air. Use chopsticks to gently stir along the sides of the pot for 2–3 minutes to release the trapped air. Proper degassing helps create a finer, more even crumb without large holes.
- Lightly press the dough with the back of your hand and shape it into a roughly even round. There's no need to make it perfect — it will naturally even out as it cooks.
Second Rise
- Cover the dough again and allow it to rise until about 1.5 times its original size, roughly 30–40 minutes. When ready, the dough will slowly spring back when pressed and won't collapse.
Cook in the Rice Cooker
- Press the “Cook / Rice” button and cook for 20 minutes.
- Open the lid and gently flip the bread using a silicone spatula or chopsticks. The bottom should already be set and lightly golden.
- Close the lid again and press “Cook / Rice” for another 10 minutes.
- If needed, flip once more and cook for an additional 2–3 minutes until both sides are evenly golden and slightly puffed.
Serve
- Remove the bread from the rice cooker and let it cool for about 2 minutes before slicing.
- Cut into wedges or pieces and enjoy while warm. The bread is soft, fluffy, and aromatic — and it stays tender even after cooling.
Nutrition


Leave a Reply