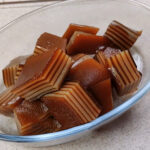
This steamed tapioca cake is one of my all-time favorite steamed desserts.
With just five simple ingredients—tapioca starch, pure milk, brown sugar, and white sugar—you can make this beautiful, layered treat without any advanced techniques.
It’s so straightforward that even beginners can achieve perfect results on their first try.")
If you’ve tried my Water Chestnut Cake with Coconut Milk, you’ll notice a similar soothing, steamed texture and naturally gentle sweetness, but here the charm lies in the chewy, layered structure and the stunning contrast between the caramel-hued brown sugar layers and creamy white ones.")
")
Ingredients and Substitutions
- Tapioca Starch – This is the essential, non-negotiable ingredient for achieving the signature QQ, bouncy, and translucent texture. Do not substitute with cornstarch, potato starch, or wheat flour, as they will produce a completely different (and gummy or dense) result.
- Brown Sugar – I recommend using a dark or pure brown sugar for the best flavor and a rich, caramel-red color in the layers.
- White Sugar – Used in the white layers to provide a clean, gentle sweetness that balances the richer brown sugar. Granulated sugar works perfectly.
- Pure Milk – Whole milk is ideal for the richest flavor and creamiest white layers, but low-fat or a plain, unsweetened non-dairy milk (like oat or soy) can be used as a substitute.
- Water – Using warm water (not hot) to dissolve the brown sugar is key.
How to Make Tapioca Thousand-Layer Cake
1. Prepare the Red and White Batters
For the Red Batter: In a medium bowl, combine the brown sugar and warm water. Stir until the sugar is completely dissolved. Let the mixture cool to room temperature. Once cool, add the tapioca starch and whisk vigorously until you have a completely smooth, lump-free liquid. Strain the batter through a fine-mesh sieve into a pouring jug or bowl to catch any undissolved bits. Set aside.

 For the White Batter: In a separate medium bowl, combine the white sugar and milk. Stir until the sugar dissolves. Add the tapioca starch and whisk until completely smooth and lump-free. Strain this batter through a sieve into another pouring jug or bowl. Set aside.

2. Steam the Layers
Prepare your steamer by bringing plenty of water to a rolling boil. Lightly grease a heatproof dish or pan (like a 7-inch round or square pan) that fits inside your steamer.
Place the empty dish in the steamer to preheat for about 1 minute. This helps prevent sticking.
Start with the first layer: Give the red batter a good stir (tapioca settles quickly!). Pour a thin, even layer (about 2-3 tablespoons, or enough to just coat the bottom) into the preheated dish. Immediately cover the steamer and steam on high heat for 2-3 minutes, or until the layer is completely set and translucent.
Add the second layer: Carefully lift the lid. Quickly stir the white batter, then pour an even layer of the same thickness over the first set red layer. Cover and steam for another 2-3 minutes until set.
Repeat the process, always stirring the batter you’re about to use, and alternating colors (red, white, red, white…). Continue steaming each layer for 2-3 minutes until set. Aim for a total of 11 layers (6 red, 5 white), finishing with a red layer. Steam this final layer for a full 3 minutes to ensure it’s firm.
3. Cool, Set, and Slice
Turn off the heat and carefully remove the container. Allow the cake to cool completely at room temperature, about 10 minutes.
Once fully cooled, run a knife gently around the edges, invert the container, and unmold the cake. Cut into small pieces and serve.
Tips & Tricks
- Always strain your batter. This ensures a smooth, glossy finish and prevents unpleasant lumps.
- Let the brown sugar mixture cool completely before adding tapioca starch to avoid premature setting.
- Stir the batter before every layer. Tapioca starch settles quickly, and skipping this step will cause uneven layers.
- Keep steaming time consistent. Too short and the layer won’t set; too long and layers may fuse together.
- Unmold only when fully cooled. The cake is very soft when hot and can deform easily.
- For an even QQ-er texture, refrigerate the cake for 1 hour after unmolding before slicing.
Frequently Asked Questions
Can I make this ahead of time?
Absolutely! This cake is an excellent make-ahead dessert. Prepare it, let it cool completely, then cover and refrigerate for up to 2 days. Slice just before serving.
Why are my layers mixing/not defined?
This usually happens if the previous layer isn’t fully set before adding the next. Ensure each layer is completely translucent and firm (no wet, shiny spots) after its 2-3 minutes of steaming before proceeding.
My cake is very sticky/tacky. What went wrong?
This is normal for fresh tapioca cakes at room temperature and is part of its QQ charm. For less surface tackiness, ensure you chill it thoroughly before slicing. The stickiness also confirms you used the correct ingredient—tapioca starch.
Can I use coconut milk instead of regular milk?
Yes, you can substitute pure milk with full-fat canned coconut milk for a tropical flavor. The white layers will have a slight off-white color and a rich coconut aroma.
How do I store leftovers?
Store any leftover sliced cake in an airtight container in the refrigerator for up to 3 days. The texture will remain excellent. It is not recommended to freeze it, as it can become brittle and lose its desirable QQ quality upon thawing.
Easy Tapioca Steamed Cake – Soft, Bouncy & Naturally Layered
Ingredients
Red Batter
- 80 g brown sugar
- 300 g warm water 30-40°C / 85-105°F
- 200 g tapioca starch
White Batter
- 60 g white sugar
- 200 g pure milk
- 150 g tapioca starch
Instructions
Prepare the Red and White Batters
- For the Red Batter: In a medium bowl, combine the brown sugar and warm water. Stir until the sugar is completely dissolved. Let the mixture cool to room temperature. Once cool, add the tapioca starch and whisk vigorously until you have a completely smooth, lump-free liquid. Strain the batter through a fine-mesh sieve into a pouring jug or bowl to catch any undissolved bits. Set aside.
- For the White Batter: In a separate medium bowl, combine the white sugar and milk. Stir until the sugar dissolves. Add the tapioca starch and whisk until completely smooth and lump-free. Strain this batter through a sieve into another pouring jug or bowl. Set aside.
Steam the Layers
- Prepare your steamer by bringing plenty of water to a rolling boil. Lightly grease a heatproof dish or pan (like a 7-inch round or square pan) that fits inside your steamer.
- Place the empty dish in the steamer to preheat for about 1 minute. This helps prevent sticking.
- Start with the first layer: Give the red batter a good stir (tapioca settles quickly!). Pour a thin, even layer (about 2-3 tablespoons, or enough to just coat the bottom) into the preheated dish. Immediately cover the steamer and steam on high heat for 2-3 minutes, or until the layer is completely set and translucent.
- Add the second layer: Carefully lift the lid. Quickly stir the white batter, then pour an even layer of the same thickness over the first set red layer. Cover and steam for another 2-3 minutes until set.
- Repeat the process, always stirring the batter you're about to use, and alternating colors (red, white, red, white...). Continue steaming each layer for 2-3 minutes until set. Aim for a total of 11 layers (6 red, 5 white), finishing with a red layer. Steam this final layer for a full 3 minutes to ensure it's firm.
Cool, Set, and Slice
- Turn off the heat and carefully remove the container. Allow the cake to cool completely at room temperature, about 10 minutes.
- Once fully cooled, run a knife gently around the edges, invert the container, and unmold the cake. Cut into small pieces and serve.
Nutrition


Leave a Reply