Another classic vegan bun that you’re sure to fall in love with once you try it! Follow my foolproof dough recipe to create fluffy, soft noodle buns that will delight your taste buds.
Unlock the Secret to Fluffy Buns
I’ve shared a variety of bun recipes, and here are some classic favorites:
- Steamed Beef Buns
- Red Bean Paste Buns
- Mini Red Bean Buns
- Milk Mantou
- Chinese Sugar Buns
- Sweet Potato Mantou
- Spinach Buns
Once you’ve mastered the art of the perfect bun wrapper—fluffy, white, and soft—you’ll be excited to explore all kinds of fillings. The possibilities are endless!
Here’s another incredible vegan bun that you can customize to your liking. Trust me, it’s a great alternative to meat buns like pork or beef buns, and you might even find it tastier than the traditional versions.
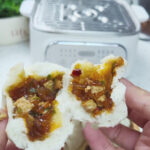
These noodle buns are quite similar to my tofu buns, as I also include tofu and zha choy, a popular pickled vegetable in Chinese cuisine. Zha choy is often used as a savory topping for congee. If you can’t find it, you can simply leave it out.
What are Vermicelli noodles
Vermicelli noodles are thin, long noodles that come in various forms depending on the cuisine. In Asian cooking, vermicelli noodles are typically made from rice or mung beans, and they’re very fine and translucent when cooked.
They are very versatile and typically require soaking in warm water to soften before cooking. They absorb the flavors of the dishes they’re in and can add a satisfying texture, particularly in fillings for dishes like noodle buns.
I use precut vermicelli noodles, which saves time during preparation. If you’re using whole vermicelli noodles, you can simply soak them in warm water until soft, then cut them into smaller pieces to match the texture.
What is Doubanjiang
If you love Sichuan recipes, you must be familiar with Doubanjiang (豆瓣酱). This fermented Chinese chili bean paste is made from broad beans (also known as fava beans), soybeans, salt, rice, and chili peppers.
Hailing from Sichuan province, Doubanjiang is a staple ingredient in Sichuan cuisine, renowned for its ability to impart a deep, savory umami flavor with a spicy kick.
It plays a crucial role in many iconic Sichuan dishes, such as Mapo Tofu and Twice-Cooked Pork.
I love adding some Doubanjiang to my fillings because it elevates the flavor with that delightful heat!
Ingredients
Dough:
- 500g all-purpose flour
- 3g dry yeast
- 275g warm water (30-40°C)
Filling:
- 100-150g vermicelli noodles (pre-soaked and cut into small pieces)
- 1 block of tofu (200-300g), cubed
- 20g light soy sauce
- 1 tsp dark soy sauce
- 10g oyster sauce (omit for vegan, or use vegan oyster sauce)
- 3-5g salt
- 3-5g chicken seasoning (optional, omit for vegan)
- 2 tbsp Pixian Doubanjiang (broad bean paste)
- 50-80g preserved mustard (zha cai, optional), finely chopped
- 30-50g cooking oil
- 60g green onions (white part: 20g, green part: 40g)
Instructions
Step 1: Prepare the Dough
- In a large bowl, combine 500g of flour and 3g of yeast.
- Gradually pour 275g of warm water into the flour while stirring continuously. Continue mixing until a shaggy dough forms.
- Knead the dough on a floured surface for 8-10 minutes until it becomes smooth and elastic. The dough should be slightly tacky to the touch.
- Cover the dough with a damp cloth or plastic wrap and let it rest in a warm place for about 1 hour, or until it doubles in size.

Step 2: Prepare the Filling
- Soak the vermicelli noodles in warm water for 20-30 minutes until soft. Drain and cut into smaller pieces if necessary.
- Cut the tofu into small cubes (about 1-1.5 cm). Set aside.
- Finely chop the preserved mustard (zha cai). If it’s too salty, rinse it under water before chopping.
- In a large bowl, mix the softened noodles, tofu, and zha cai. Add the light soy sauce, dark soy sauce, oyster sauce, salt, chicken seasoning (if using), and Pixian Doubanjiang. Stir to combine.
- Add white parts of the green onions. Heat 30-50g of cooking oil in a small pan until it reaches 70-80% heat (just starting to smoke). Carefully pour the hot oil over the filling mixture and stir to combine. This step helps release the full aroma of the seasonings.
- Finally, add the green parts of the green onions and mix everything together. The filling is now ready.Chill the filling in the fridge for 30 minutes. This makes it easier to handle when shaping the buns.


Step 3: Shape the Buns(Check out my beginner-friendly slow-motion tutorial on how to wrap buns!)
- Once the dough has doubled in size, punch it down to release the air. Knead it briefly and shape it into a log.
- Divide the dough into 20 equal portions and roll each piece into a ball.
- Take one dough ball and roll it out into a circle, with the edges thinner than the center.
- Place a spoonful of the filling in the center of the dough circle. Carefully gather the edges and pleat the dough around the filling, sealing the bun at the top. Make sure to pinch the seam tightly to prevent it from opening during steaming.
- Place the shaped buns on parchment paper squares to prevent sticking.

Step 4: Second Rise and Steaming
- Arrange the buns in a steamer, leaving enough space between each one for expansion.
- Let the buns rise for a second time in a warm, moist environment for 15-20 minutes, or until they puff up slightly. You can place the steamer in a warm spot or over a pot of warm water (without turning the heat on).
- Once the buns have risen, bring a large pot of water to a boil.
- Steam the buns over high heat for 15 minutes. Keep the heat steady to ensure even cooking.
- After 15 minutes, turn off the heat and let the buns rest in the steamer for an additional 3-5 minutes before opening the lid. This will help prevent the buns from shrinking.


Notes:
- Dough: Make sure to knead the dough until it’s smooth and elastic. This ensures a soft texture for the buns.
- Doubanjiang: Adjust the amount of Pixian Doubanjiang based on your spice tolerance. It adds both heat and depth of flavor, so start with two tablespoons and add more if desired.
- Steaming Tips: Don’t skip the resting time after turning off the heat. This allows the buns to cool gradually, preventing them from collapsing.
Noodle Buns with Tofu Recipe
Ingredients
Dough:
- 500 g all-purpose flour
- 3 g dry yeast
- 275 g warm water 30-40°C
Filling:
- 100-150 g vermicelli noodles pre-soaked and cut into small pieces
- 1 block of tofu 200-300g, cubed
- 20 g light soy sauce
- 1 tsp dark soy sauce
- 3-5 g salt
- 3-5 g chicken seasoning optional, omit for vegan
- 2 tbsp Pixian Doubanjiang broad bean paste
- 50-80 g preserved mustard zha cai, optional, finely chopped
- 30-50 g cooking oil
- 60 g green onions white part: 20g, green part: 40g
Instructions
Step 1: Prepare the Dough
- In a large bowl, combine 500g of flour and 3g of yeast.
- Gradually pour 275g of warm water into the flour while stirring continuously. Continue mixing until a shaggy dough forms.
- Knead the dough on a floured surface for 8-10 minutes until it becomes smooth and elastic. The dough should be slightly tacky to the touch.
- Cover the dough with a damp cloth or plastic wrap and let it rest in a warm place for about 1 hour, or until it doubles in size.
Step 2: Prepare the Filling
- Soak the vermicelli noodles in warm water for 20-30 minutes until soft. Drain and cut into smaller pieces if necessary.
- Cut the tofu into small cubes (about 1-1.5 cm). Set aside.
- Finely chop the preserved mustard (zha cai). If it's too salty, rinse it under water before chopping.
- In a large bowl, mix the softened noodles, tofu, and zha cai. Add the light soy sauce, dark soy sauce, oyster sauce, salt, chicken seasoning (if using), and Pixian Doubanjiang. Stir to combine.
- Add white parts of the green onions. Heat 30-50g of cooking oil in a small pan until it reaches 70-80% heat (just starting to smoke). Carefully pour the hot oil over the filling mixture and stir to combine. This step helps release the full aroma of the seasonings.
- Finally, add the green parts of the green onions and mix everything together. The filling is now ready.Chill the filling in the fridge for 30 minutes. This makes it easier to handle when shaping the buns.
Step 3: Shape the Buns(Check out my beginner-friendly slow-motion tutorial on how to wrap buns!)
- Once the dough has doubled in size, punch it down to release the air. Knead it briefly and shape it into a log.
- Divide the dough into 20 equal portions and roll each piece into a ball.
- Take one dough ball and roll it out into a circle, with the edges thinner than the center.
- Place a spoonful of the filling in the center of the dough circle. Carefully gather the edges and pleat the dough around the filling, sealing the bun at the top. Make sure to pinch the seam tightly to prevent it from opening during steaming.
- Place the shaped buns on parchment paper squares to prevent sticking.
Step 4: Second Rise and Steaming
- Arrange the buns in a steamer, leaving enough space between each one for expansion.
- Let the buns rise for a second time in a warm, moist environment for 15-20 minutes, or until they puff up slightly. You can place the steamer in a warm spot or over a pot of warm water (without turning the heat on).
- Once the buns have risen, bring a large pot of water to a boil.
- Steam the buns over high heat for 15 minutes. Keep the heat steady to ensure even cooking.
- After 15 minutes, turn off the heat and let the buns rest in the steamer for an additional 3-5 minutes before opening the lid. This will help prevent the buns from shrinking.


Leave a Reply