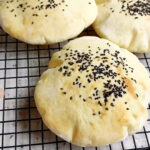
If you’ve ever wanted to make Chinese-style hollow pocket bread at home, this recipe is for you! Believe me—these pockets are so much easier than they look.
You don’t need complicated techniques or long waiting times.
Follow the steps carefully, and even beginners can make perfectly hollow, soft, and golden breads.")
These breads are extremely versatile, healthy, and fun—similar to Chinese Burger Buns, they can be stuffed with vegetables, eggs, or meat, or even used as homemade burger buns.
Their hollow interior gives you endless possibilities!")
I’ve tried this over and over, and it never fails—so don’t worry, you’ve got this!
Ingredients and Substitutions
- All-purpose flour – This is the ideal flour for creating a dough that’s strong enough to hold its structure yet tender enough to puff up beautifully. I do not recommend substituting with bread flour (which can make the crust too tough) or cake flour (which lacks the necessary strength).
- High-activity yeast – This is the key leavening agent that makes the dough rise and helps create the air pockets necessary for the final “puff.” It can be mixed directly with the dry ingredients—no proofing in water needed.
- Egg – Adding one egg to the dough enriches it, contributing to a softer, more tender crumb and a lovely golden color.
- Warm water – The temperature is important. Use water that feels warm to the touch (around 30-35°C / 85-95°F) to optimally activate the yeast without killing it.
- Sugar – We use just a small amount to gently feed the yeast and support fermentation. It does not make the bread taste sweet.
- Baking powder – This acts as a secondary leavening agent, giving the dough an extra boost to ensure a consistent and reliable puff in the oven’s high heat. If you don’t have it, the recipe will still work, but the hollow effect might be slightly less dramatic.
- Salt – Essential for balancing and enhancing the natural wheat flavor.
- Corn oil – A neutral-tasting oil that keeps the dough soft and supple, and prevents the finished bread from drying out too quickly. A mild olive oil or melted neutral-tasting fat like avocado oil can be used as a substitute.
- Black sesame seeds – Purely optional for a decorative finish and a subtle nutty aroma. You can skip them or use white sesame seeds instead.
")
How to Make Chinese Hollow Pocket Bread
1. Mix and First Proof
In a large bowl, combine flour, baking powder, and salt. Mix well.
Add yeast and sugar, then crack in the egg and pour in warm water.
Stir with chopsticks until a shaggy dough forms with no dry flour remaining.
Add corn oil and knead into a cohesive dough. The dough may feel sticky initially—that’s normal.

Transfer to a work surface and knead using a push-and-fold motion for 3 minutes until smooth.
Shape into a ball, place in a bowl, cover, and proof in a warm place (28–30°C) until doubled in size and airy with even bubbles.
This typically takes about 40 minutes to 1 hour, depending on the warmth of your kitchen. The dough is ready when you gently poke it with a floured finger and the indentation slowly springs back only halfway.
2. Shape and Second Proof
Once risen, turn it out onto a lightly floured surface.
Punch and knead to remove air bubbles.
Divide into 8 equal portions.
Take one portion of dough, knead it a few times, then roll it into a ball and flatten it with your palm.

Use a rolling pin to roll it into a circle about 10-12 cm (4-5 inches) in diameter and roughly 3 mm (about 1/8 inch) thick
Lightly brush with water and sprinkle black sesame seeds if desired.
Place on a floured surface, cover with a damp cloth, and rest for 10 minutes for the second proof.
3. Bake to Create Hollow Pockets
Arrange dough rounds on a baking tray with space between them.
Bake for ~6 minutes, until the breads puff and turn lightly golden with slight charring. Adjust time for thickness and oven strength.
Remove and cool on a wire rack. The hollow pocket will naturally form as the bread cools.
4. Serve and Stuff
Once slightly cooled, make a small cut on the side of each pocket (don’t cut all the way through).")
")
Fill with your choice of eggs, luncheon meat, vegetables, salad, sauces, or cooked meats.
Enjoy as a breakfast bread, snack, or homemade burger bun!
Tips & Tricks
Hollow Pocket Tips
- Keep the dough thickness uniform at ~0.3 cm; too thick won’t puff, too thin may tear.
- Second proof for 10 minutes relaxes the dough for better puffing.
- Bake at high temperature (230°C) for rapid expansion and hollow pockets.
Dough Handling
- High-hydration dough feels sticky initially. Knead for 3 minutes and it will smooth out.
- Use flour sparingly to prevent sticking; too much makes bread dry.
Baking Troubleshooting
- Preheat oven fully to ensure even heat.
- Avoid opening the oven door during baking.
- If pockets collapse, bake 1–2 minutes longer to help them set.
Frequently Asked Questions
Why didn‘t my pitas puff up?
The most common reasons are: 1) The dough was rolled too thick or unevenly. 2) The oven wasn’t hot enough. Ensure full preheating and use an oven thermometer if possible. 3) The dough was over-proofed and lost its strength, or under-proofed and didn’t have enough gas built up.
How do I store leftover pita bread?
Once completely cool, store them in an airtight plastic bag at room temperature for up to 2 days. To refresh, warm them briefly in a toaster or a dry skillet. For longer storage, freeze them in a freezer bag for up to 2 months. Thaw at room temperature or warm directly from frozen.
Chinese Pita Bread – Soft, Hollow & Easy at Home
Ingredients
Pita Dough
- 400 g all-purpose flour
- 4 g high-activity yeast
- 8 g sugar
- 2 g baking powder
- 1 g salt
- 1 large egg about 50 g
- 200 g warm water 30-35°C / 85-95°F
- 10 g corn oil
- Black sesame seeds for topping (optional)
For Dusting
- Extra all-purpose flour as needed
Instructions
Mix and First Proof
- In a large bowl, combine flour, baking powder, and salt. Mix well.
- Add yeast and sugar, then crack in the egg and pour in warm water.
- Stir with chopsticks until a shaggy dough forms with no dry flour remaining.
- Add corn oil and knead into a cohesive dough. The dough may feel sticky initially—that's normal.
- Transfer to a work surface and knead using a push-and-fold motion for 3 minutes until smooth.
- Shape into a ball, place in a bowl, cover, and proof in a warm place (28–30°C) until doubled in size and airy with even bubbles.
- This typically takes about 40 minutes to 1 hour, depending on the warmth of your kitchen. The dough is ready when you gently poke it with a floured finger and the indentation slowly springs back only halfway.
Shape and Second Proof
- Once risen, turn it out onto a lightly floured surface.
- Punch and knead to remove air bubbles.
- Divide into 8 equal portions.
- Take one portion of dough, knead it a few times, then roll it into a ball and flatten it with your palm.
- Use a rolling pin to roll it into a circle about 10-12 cm (4-5 inches) in diameter and roughly 3 mm (about 1/8 inch) thick
- Lightly brush with water and sprinkle black sesame seeds if desired.
- Place on a floured surface, cover with a damp cloth, and rest for 10 minutes for the second proof.
Bake to Create Hollow Pockets
- Preheat oven to 230°C (446°F).
- Arrange dough rounds on a baking tray with space between them.
- Bake for ~6 minutes, until the breads puff and turn lightly golden with slight charring. Adjust time for thickness and oven strength.
- Remove and cool on a wire rack. The hollow pocket will naturally form as the bread cools.
Serve and Stuff
- Once slightly cooled, make a small cut on the side of each pocket (don't cut all the way through).
- Fill with your choice of eggs, luncheon meat, vegetables, salad, sauces, or cooked meats.
- Enjoy as a breakfast bread, snack, or homemade burger bun!


Leave a Reply