This ultra-soft milk sandwich bread is made with pure milk, eggs, milk powder, and butter for a rich dairy aroma and a beautifully stretchy crumb. The loaf is fluffy yet sturdy, slices cleanly, and holds fillings perfectly—ideal for everyday sandwiches and kids’ lunches. ")
")
My Sandwich Bread Recipe
After sharing my Hokkaido Milk Bread recipe, I wanted to share another similar favorite—this soft milk sandwich bread.
Honestly, making this milk bread has completely changed our lunch routine. Before, grabbing a sandwich from a café or deli was always the easy go-to.
But once you taste the difference homemade makes, it’s hard to go back.
Using pure milk in the dough isn’t just a step—it’s the secret. It fills your kitchen with the most comforting, warm aroma while it bakes, and the result is a loaf that’s impossibly soft, with a sweet, milky flavor and that satisfying, stretchy pull-apart texture you just don’t get from store-bought loaves.
The real victory? Turning it into sandwiches. Whether it’s a simple ham and cheese or a stacked club, this bread holds up perfectly without getting soggy and adds its own delicious dimension.
My kids, who used to be picky about bread crusts, now ask for seconds.
Knowing exactly what’s in it—no additives, no preservatives—makes every bite that much more satisfying. It’s more than a recipe; it’s a tastier, healthier habit we’ve all happily adopted.")
")
Why You’ll Love This Recipe
- This sandwich bread is exceptionally soft, stretchy, and fluffy, perfect for slicing or pulling apart.
- The dough uses pure milk instead of water, along with milk powder and eggs, for a rich but balanced dairy flavor.
- The crumb is fine and elastic, which means it holds sandwich fillings without tearing.
- The recipe is stand-mixer friendly, with clear fermentation cues that make it approachable for beginners.
- It’s completely homemade and additive-free, making it a healthier and more reassuring choice for kids.
Milk Bread Ingredients
For the Dough
- 260 g bread flour
- 100 g whole eggs (about 2 large), room temperature
- 380 g whole milk, warmed to about 30°C (85°F)
- 20 g full-fat milk powder
- 60 g unsalted butter, softened
- 80 g granulated sugar
- 4 g fine sea salt
- 8 g instant yeast (or active dry yeast, see note)
Note on Yeast: If using active dry yeast, it’s best to dissolve it in the 380g of warm milk with a pinch of the sugar and let it sit for 5-10 minutes until foamy before adding to the other ingredients. Instant yeast can be mixed directly with the dry ingredients.
How to Make Milk Sandwich Bread
Mix Ingredients and Initial Kneading
Add the bread flour, eggs, milk, sugar, salt, milk powder, and yeast to the stand mixer bowl in sequence. Make sure the yeast is kept separate from the salt and sugar to avoid reducing its activity.
Mix on low speed for 1 minute until everything comes together into a rough dough. Increase to high speed and knead for 7–8 minutes, until the dough becomes cohesive and can be stretched into a thick membrane. At this stage, the dough may tear with slightly rough edges.
Add Butter and Knead to Windowpane
Add the softened butter to the dough and continue kneading on high speed for about 10 minutes. The dough should become smooth, elastic, and capable of stretching into a thin, translucent windowpane with smooth tear edges. Shape the dough lightly into a round.
To test if the gluten is fully developed, take a small piece of dough and gently stretch it between your fingers. It should stretch into a thin, translucent membrane without tearing immediately. This is the “windowpane” stage and is key for the bread’s texture.
First Fermentation
Return the dough to the mixing bowl and ferment at 38°C for about 1 hour, until doubled in size.
To test, gently press a finger into the dough—if the indentation remains without springing back or collapsing, fermentation is complete.
Degassing, Dividing, and Resting
Transfer the dough to a work surface and gently press to release excess gas. Divide evenly into 6 portions.
Shape each portion into a ball, cover with plastic wrap, and let rest for 20 minutes.
After resting, roll each portion into a long oval, gently pressing the edges to release air.
Roll up from one end into a log shape.
Once all pieces are shaped, cover again and rest for another 20 minutes.
Final Shaping and Second Fermentation
Roll each rested piece out again into a long oval and roll up tightly. A tighter roll will result in a finer crumb.
Place 3 rolled pieces upright into each loaf pan. Proof in a warm, humid environment until the dough reaches about 70% of the pan height. Avoid over-proofing, as this can cause the loaf to collapse during baking.
Baking
Preheat the oven to 160°C (top and bottom heat). Place the loaf pans on the middle rack and bake for 40 minutes, until the tops are evenly golden. The loaf should spring back lightly when pressed.
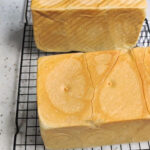
Remove immediately from the oven, unmold, and cool completely on a wire rack before slicing to prevent tearing or crumbling.
Tips & Tricks
- Use proper bread flour to ensure strong gluten development and a stretchy crumb.
- Soften the butter fully before adding it to the dough so it incorporates evenly.
- Watch the dough, not the clock during fermentation—volume and texture are more important than time.
- Roll the dough tightly during shaping to achieve a fine, sandwich-friendly crumb.
- Cool completely before slicing to keep the slices neat and intact.
Frequently Asked Questions
Why isn’t my bread stretchy?
This is usually due to insufficient kneading or using flour with too little protein. Make sure the dough reaches a proper windowpane stage before fermentation.
Can I reduce the sugar?
You can slightly reduce it, but sugar contributes to softness, browning, and fermentation. Reducing too much may affect texture.
Why did my bread collapse after baking?
Over-proofing during the second fermentation is the most common cause. Stop proofing once the dough reaches about 70% of the pan height.
Is this bread suitable for freezing?
Yes. Once fully cooled, slice and freeze in an airtight bag. Thaw at room temperature or toast directly from frozen.
Pure Milk Sandwich Bread Recipe (Soft, Fluffy & Perfect for Sandwiches)
Ingredients
- 260 g bread flour
- 100 g whole eggs about 2 large, room temperature
- 380 g whole milk warmed to about 30°C (85°F)
- 20 g full-fat milk powder
- 60 g unsalted butter softened
- 80 g granulated sugar
- 4 g fine sea salt
- 8 g instant yeast
Instructions
Mix Ingredients and Initial Kneading
- Add the bread flour, eggs, milk, sugar, salt, milk powder, and yeast to the stand mixer bowl in sequence. Make sure the yeast is kept separate from the salt and sugar to avoid reducing its activity.
- Mix on low speed for 1 minute until everything comes together into a rough dough. Increase to high speed and knead for 7–8 minutes, until the dough becomes cohesive and can be stretched into a thick membrane. At this stage, the dough may tear with slightly rough edges.
Add Butter and Knead to Windowpane
- Add the softened butter to the dough and continue kneading on high speed for about 10 minutes. The dough should become smooth, elastic, and capable of stretching into a thin, translucent windowpane with smooth tear edges. Shape the dough lightly into a round.
- To test if the gluten is fully developed, take a small piece of dough and gently stretch it between your fingers. It should stretch into a thin, translucent membrane without tearing immediately. This is the "windowpane" stage and is key for the bread's texture.
First Fermentation
- Return the dough to the mixing bowl and ferment at 38°C for about 1 hour, until doubled in size.
- To test, gently press a finger into the dough—if the indentation remains without springing back or collapsing, fermentation is complete.
Degassing, Dividing, and Resting
- Transfer the dough to a work surface and gently press to release excess gas. Divide evenly into 6 portions.
- Shape each portion into a ball, cover with plastic wrap, and let rest for 20 minutes.
- After resting, roll each portion into a long oval, gently pressing the edges to release air.
- Roll up from one end into a log shape.
- Once all pieces are shaped, cover again and rest for another 20 minutes.
Final Shaping and Second Fermentation
- Roll each rested piece out again into a long oval and roll up tightly. A tighter roll will result in a finer crumb.
- Place 3 rolled pieces upright into each loaf pan. Proof in a warm, humid environment until the dough reaches about 70% of the pan height. Avoid over-proofing, as this can cause the loaf to collapse during baking.
Baking
- Preheat the oven to 160°C (top and bottom heat). Place the loaf pans on the middle rack and bake for 40 minutes, until the tops are evenly golden. The loaf should spring back lightly when pressed.
- Remove immediately from the oven, unmold, and cool completely on a wire rack before slicing to prevent tearing or crumbling.


Leave a Reply